
In this manual, a few simple ways to make the Windows 7 boot flash drive using free software and without programs. I will draw your attention to the fact that if you have already recorded such a drive, but it is not possible to boot, you may have done everything right, but did not change some BIOS / UEFI settings, more about it in the material why BIOS / UEFI does not see the boot flash drive And how to fix it.
First of all, to create a boot flash drive of Windows 7, you will need a USB drive, 4-8 GB (depends on the ISO image used), as well as the ISO image with Windows 7. Unfortunately, on the official Microsoft website, the download of this image has become inaccessible for most users. But, I hope he is in stock. It can also be useful: the best programs for creating a boot flash drive, how to make a bootable USB flash drive.
- The official Windows 7 USB / DVD DOWNLOAD TOOL utility (only for loading in Legacy / CSM and installation on the MBR disc).
- Windows 7 boot flash drive in RUFUS
- Creating an installation USB drive in Ultraiso
- Boot and Multi-load flash drive in WinsetupFromusB
- How to make a bootable USB flash drive without programs
- Video instruction
Creating a bootable flash drive in the official Utility of Windows 7 USB / DVD Download Tool
After some time, after the release of Windows 7, Microsoft introduced a special free utility to record the loading flash drive or DVD disk. The program is also available today, but consider it only for installation in the LEGACY mode to the MBR disk (if you do not know what it is, then, if briefly: old computers and laptops used only such a mode, modern devices use UEFI download And GPT discs, but you can switch to the old mode).
The procedure for creating a bootable flash drive of Windows 7 in the utility consists of the following steps:
- Run Windows 7 USB / DVD Download Tool, click the Browse button and specify the path to the ISO image with Windows 7.

- In the next step, press USB Device to record the image on the USB flash drive.

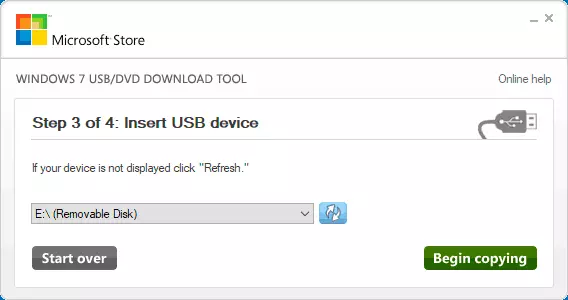
- Select your USB drive and click Begin Copying. You will be warned that all data from the flash drives will be deleted if you agree - click the Erase All Data button.
- Upon completion, you will receive a ready-made boot flash drive to install Windows If you create a red strip and the message "We WE WERE UNBLE TO RUN BOOTSECT TO MAKE THE USB DEVICE BOOTABLE", Run the command prompt on the administrator name and enter the BootSect / NT60 E command: (Replacing E your letter flash drive). After successfully executing the command, the flash drive will become bootable.

Download Windows 7 USB / DVD DOWNLOAD TOOL From the official site Microsoft - https://www.microsoft.com/en-us/download/details.aspx?id=56485
Windows 7 boot flash drive in RUFUS
RUFUS is one of the most popular free programs for creating boot USB drives, fully in Russian, which, including help to make the Windows 7 installation boot flash drive.

The procedure for action in the program is very simple:
- Select the USB flash drive and by clicking the "Select" button, specify the path to the image of the ISO Windows 7.
- Select the disk partition scheme (MBR for Legacy and GPT for UEFI).
- The remaining parameters in the general case should not be changed, it is enough just to click the "Start" button to start recording the drive. Available data from flash drives will be deleted.
Detailed instructions on the use of the program of the latest version and where to download it in the article: boot flash drive in RUFUS.
How to make a bootable USB flash drive 7 in ultraiso
Ultraiso is a very popular program that many is used to record boot drives for many years. Even the free version of the program allows you to record an image on a flash drive and make it bootable, this is suitable for Windows 7, and the drive will work for Legacy (CSM) and for UEFI download.

Separate detailed instructions for using the program, video and official website in the material Creating a bootable flash drive in Ultraiso.
With WinsetUpFromusb.
The Free WinsetUpFromUSB program allows you to record not only bootable, but also multi-load flash drives with multiple images. For example, you can place not only Windows 7 on one USB drives, but also other versions of the system.

In the simplest case, the procedure for action in the program consists of steps:
- Chose a USB drive, put the Format with FBINST mark and chose the file system (NTFS for Legacy and MBR, FAT32 for UEFI and GPT).
- Next to the item for selecting images of Windows 7, 8 and Windows 10, press the button with the ellipsis and specify your image of Windows 7.
- Press the "GO" button and confirm the deletion of the available data from the drive.
In more detail about the program, as well as how to write a few images in the instructions, the boot flash drive in WinsetUpfromusb.
Windows 7 boot flash drive without programs
You can also create Windows 7 boot drive without using any third-party programs. In case you need loading in UEFI mode and installing on a GPT disk, steps will be as follows:- Format the USB flash drive in FAT32 using the system.
- Mount the Windows 7 image or open it with an archiver.
- Copy all files from the image to your USB flash drive. The EFI folder must be present in the image.
After such a simple copying, the drive will be successfully loaded in UEFI mode when Secure Boot is disabled. To download in Legacy mode, the steps will be somewhat different.
Run the command line on behalf of the administrator and enter the DiskPart command, as a result you will see an invitation to enter DiskPart commands. In order, enter the following commands:
Diskpart> List Disk (Pay attention to the number that matches your flash drive) DiskPart> Select Disk number flash drive-from-previous command Diskpart> Clean Diskpart> Create Partition Primary Diskpart> Select Partition 1 Diskpart> Active Diskpart> Format FS = NTFS Quick Diskpart> Assign Diskpart> EXITThis we graduated from the preparation of the flash drive to turn it into the boot. Mount the Windows 7 image in the system or insert a disk with the OS distribution. Next, enter the command on the command prompt:
CHDIR W7: \ BootInstead of W7, specify a disk letter with a Windows 7 distribution or a connected ISO image. Next, enter:
BootSect / NT60 USB:Replacing USB on the letter of the flash drive (but not removing the colon). Well, the last command that copies all the necessary files to install Windows 7:
XCOPY W7: \ *. * USB: \ / E / F / HIn the above command - W7 is a letter of a disk with a distribution of the operating system, and the USB must be replaced with the letter of the USB drive. The file copying process may take a long time, but at the end you will receive the Windows 7 running flash drive.
Video instruction
I hope one method is suitable in your case. If more sophisticated ways of creating boot drives are interesting, I recommend to get acquainted with the article to create a bootable flash drive in Easy2Boot.