

Earlier, I wrote about Android emulators for Windows - if you do not need to install Android to the computer, and the task is to start applications and games from android inside your operating system (i.e., run Android in the window, as a regular program), it is better to use the described In this article, the emulators program. See also: PrimeOS - Android, adapted for weak laptops and computers.
Use Android x86 to run on a computer
Android x86 is a well-known open Android OS porting project on computers, laptops and tablets with x86 and x64 processors. At the time of writing this article, the current version available for download is Android 8.1.Board flash drive Android
Download Android x86 You can on the official website http://www.android-x86.org/download, where ISO and IMG images are available for download, both configured specifically for certain models of netbooks and tablets and universal (are at the top of the list).
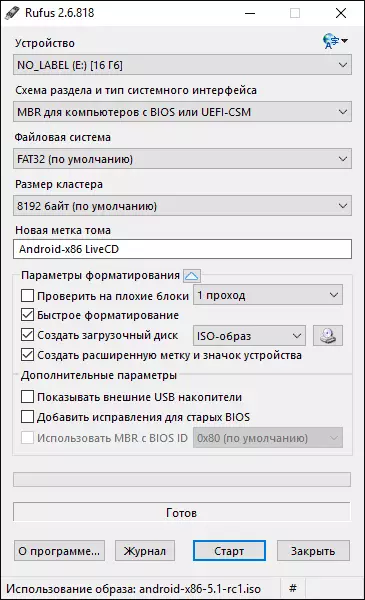
To use the image, after downloading, write it down on the disk or USB drive. I made a bootable flash drive with Android from an ISO image using the RUFUS utility using the following settings (at the same time, judging by the resulting structure on a flash drive, it should be successfully downloaded not only in CSM mode, but also in UEFI). When requesting recording mode in RUFUS (ISO or DD), select the first option.
To write an img image (which is specifically laid for EFI download), you can use the free Win32 Disk Imager program.
Running Android X86 on the computer without installation
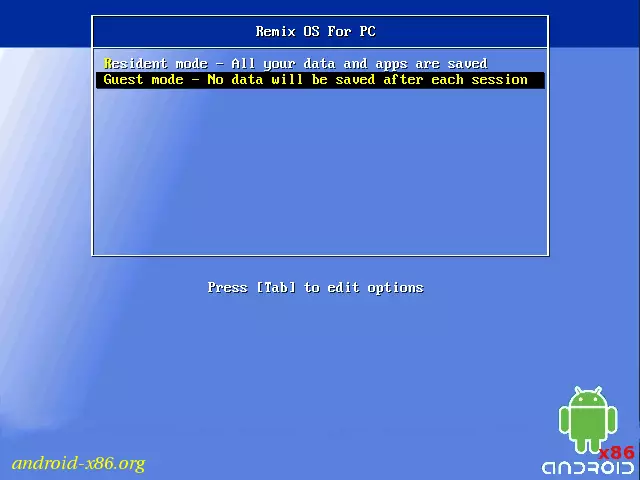
After downloading from the previously created bootable flash drive with Android (how to download the download from the flash drive to the BIOS), you will see the menu in which it will be prompted to either install Android X86 on your computer, or run OS without affecting the data on the computer. Select the first option - launch in Live CD mode.

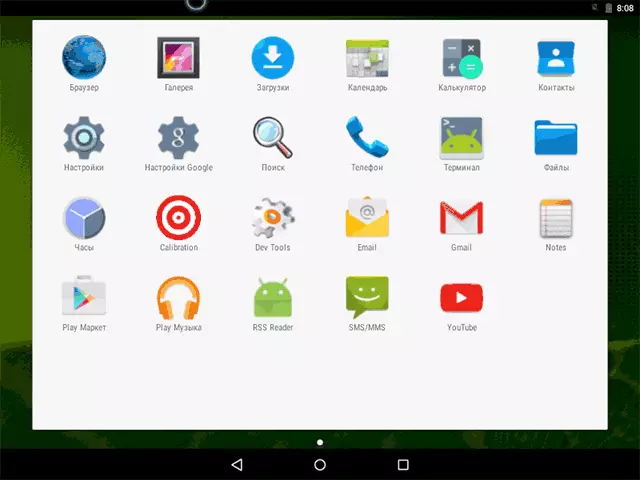
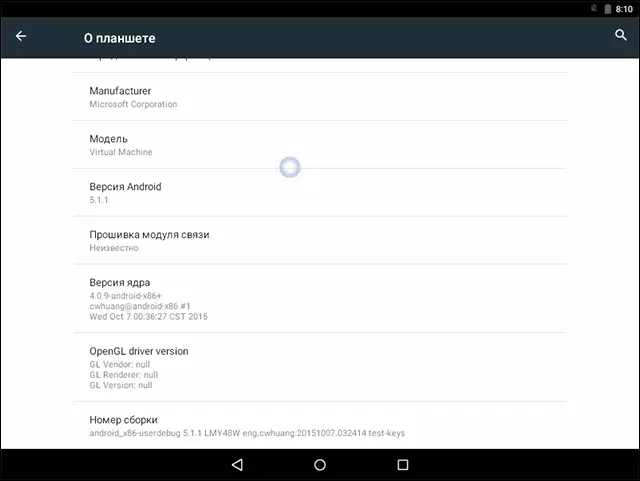
As a result, we get to the main screen Android 5.1.1 (I used this version today, in 2019, version 8.1 is available). In my test on a relatively old laptop (Ivy Bridge X64), I immediately worked: Wi-Fi, a local network (and this is not displayed with any icons, judged only to open pages in the browser with a Wi-Fi disconnected, sound, input devices) were delivered Drivers for video (there is no screenshot, it is taken from the virtual machine).
In general, everything works fine, although I checked Android performance on the computer I am not very diligently. During the check, it ranked with one hang, when opening a site in the built-in browser, which was able to "cure" only reboot. I also note that Google Play services in Android X86 are not installed by default.
Installing Android x86.
By selecting the latest menu item when booting from a flash drive (Install Android X86 to Hard Disk), you can install Android to your computer as the main OS or an additional system.
If you decide to do this, I recommend pre-(in Windows or booting from the disk with utilities to work with sections, see how to break the hard disk to the partitions) highlight a separate section to install (see how to split the disk to sections). The fact is that work with the built-in installation program tool for separating the hard disk may be difficult to understand.
Next, I only cite the installation process for a computer with two MBR (LEGACY loading, not UEFI) disks in NTFS. In the case of your installation, these parameters may differ (additional installation steps may also appear). I also recommend not to leave a section for Android in NTFS.
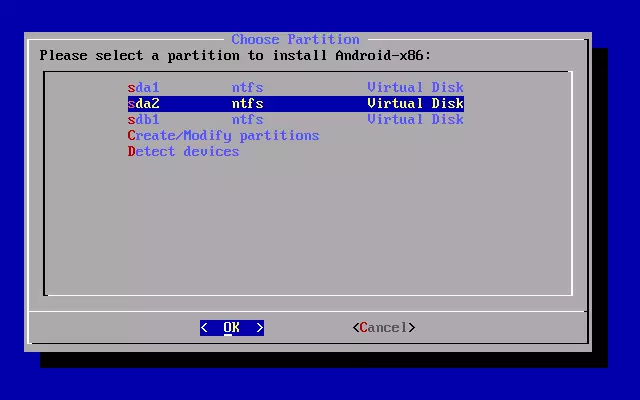
- On the first screen you will be prompted to select a section for installation. Choose the one that prepared in advance for this. I have this whole separate disk (truth, virtual).
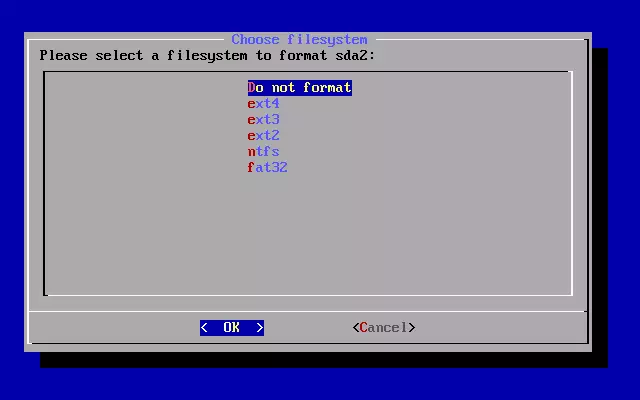
- At the second stage, you will be prompted to format the section (or not to do this). If you seriously intend to use Android on your device, I recommend EXT4 (in this case you will be available to use all the disk space, like internal memory). If you do not format it (for example, leave NTFS), at the end of the installation you will be prompted to highlight the place for user data (it is better to use the maximum value of 2047 MB).
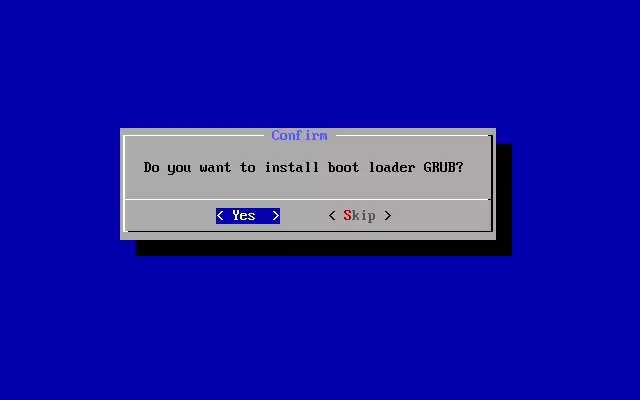
- The next step is the offer to install the Grub4DOS bootloader. Answer "Yes" if you have not only Android on your computer (for example, Windows already installed).
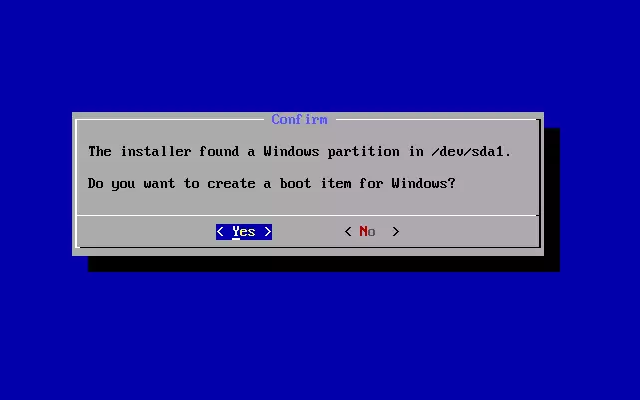
- If the installer finds other OS on the computer, it will be prompted to add them to the download menu. Do it.
- In case you use UEFI download, confirm the EFI Grub4DOS bootloader record, otherwise click Skip.
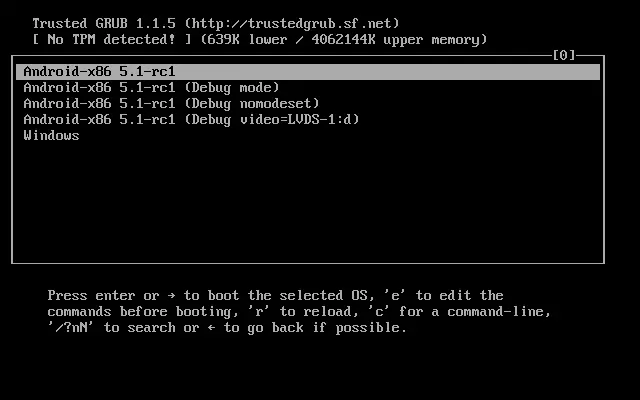
- Installing Android X86 will begin, and after it you can either immediately start the installed system, or restart the computer and select the desired OS from the download menu.
Ready, you got Android on your computer - let the controversial OS for such an application, but at least interesting.
There are separate Android operating systems, which, unlike pure Android x86, are optimized precisely for installation on a computer or laptop (i.e. more convenient to use). One of these systems is described in detail in a separate material Installing Phoenix OS, settings and use, about the second - below.
Using Remix OS for PC based on Android x86
January 14, 2016 came out (while the truth in Alpha version) is a promising Remix OS for PC operating system, built on the basis of Android x86, but offering significant improvements in the user interface precisely to use Android on the computer.
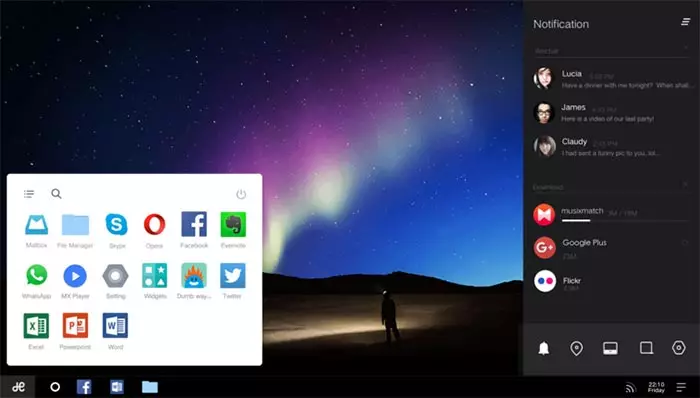
Among these improvements:
- Full multi-plate interface for multitasking (with the ability to minimize the window, deploy to full screen, etc.).
- Analogue of the taskbar and the Start menu, as well as the notification area similar to those present in Windows
- Desktop with labels, interface settings, taking into account application on a regular PC.
Also, like Android x86, Remix OS can be running in LiveCD mode or installed on a hard disk.
You can download Remix OS for Legacy and UEFI systems from an official website (in the downloadable kit there is a private utility to create a boot flash drive from OS): http://www.jide.com/remixos-for-pc.
By the way, that the first one that the second option can be launched in a virtual machine on your computer - actions will be similar to (however, it may not work, for example, Remix OS in Hyper-V I could not run).
Two more similar, adapted to use on computers and laptops version of Android - Phoenix OS and Bliss OS.