

Turning on the AHCI mode for hard drives and SSD allows you to use NCQ (Native Command Queuing) that in theory should have a positive effect on the speed of discs. In addition, AHCI supports some additional features, such as a hot disk connection. See also: How to enable AHCI mode in Windows 10 after installation.
Note: The actions described in the manual require some skills to work with a computer and understand what exactly is being done. In some cases, the procedure may not be successful and, among other things, require reinstalling Windows.
Enable AHCI in Windows 8 and 8.1
One of the easiest ways to enable AHCI after installing Windows 8 or 8.1 - use a secure mode (the same method recommends that Microsoft official support site).

To begin with, if you have errors when you start Windows 8 with AHCI mode, return the ATA IDE mode and turn on the computer. Further steps look like this:
- Run the command line on behalf of the administrator (you can press the Windows + x keys and select the desired menu item).
- In the command prompt, enter BCDEDIT / SET {CURRENT} SafeBoot Minimal and press ENTER.
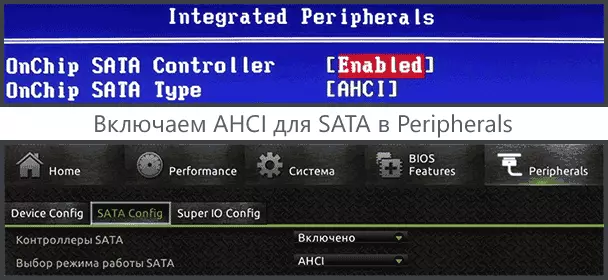
- Restart the computer and even before downloading the computer, turn on the AHCI to the BIOS or UEFI (SATA MODE or TYPE in the Integrated Peripherals section), save the settings. The computer will boot in safe mode and install the necessary drivers.
- Run the command line on behalf of the administrator and enter BCDEDIT / DELETEVALUE {CURRENT} SafeBoot
- After executing the command, restart the computer again, this time Windows 8 should boot without problems with the AHCI mode for the disk.
This is not the only way, although the most frequently described in various sources.
Another option to turn on AHCI (only for Intel).
- Load the driver from the official Intel site (F6FLPY x32 or x64, depending on which version of the operating system is installed, Zip Archive). https://downloadcenter.intel.com/detail_desc.aspx?dwnldid=24293&lang=rus&prodid=2101
- Also download the setuprst.exe file from there.
- In the Device Manager, install the F6 AHCI driver instead of 5 Series SATA or other SATA controller driver.
- Restart the computer and turn on the AHCI mode to the BIOS.
- After rebooting, run the setuprst.exe setting.
If none of the described action options helped, you can also try the first way to enable AHCI from the next part of this instruction.
How to enable AHCI in installed Windows 7
First, consider how to enable AHCI manually using the Windows registry editor 7. So, run the registry editor, for this you can press the Windows + R keys and enter the REGEDIT.
Next steps:
- Go to the HKEY_LOCAL_MACHINE \ SYSTEM \ CURRENTCONTROLSET \ SERVICES \ MSAHCI registry key
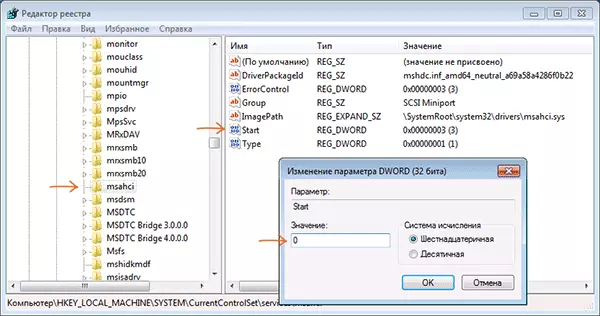
- In this section, change the value of the START parameter to 0 (by default - 3).
- Repeat this action in the HKEY_LOCAL_MACHINE \ SYSTEM \ CURRENTCONTROLSET \ SERVICES \ IASTORV section

- Close the registry editor.
- Restart the computer and enable AHCI to BIOS.
- After the next reboot of Windows 7, the installation of drive drivers will start, after which the reboot will be required again.
As you can see, nothing complicated. After turning on the AHCI mode in Windows 7, I recommend checking whether to write caching to the disk in its properties and turn it on if not.
In addition to the described method, you can use the Microsoft Fix IT utility in order to remove errors after changing the SATA mode (AHCI) automatically. The utility can be downloaded from the official page (Update 2018: the utility for automatic correction on the site is no longer available, only information on manual troubleshooting) http://support.microsoft.com/kb/922976/en.

After starting the utility, all the necessary changes in the system will be executed automatically, and the error inaccesable_boot_device (0x0000007B) will have to disappear.