

In this instruction details the ways to remove this disk from the conductor (hide the recovery section) so that it is not displayed, as it was before, also at the end of the article - video, where the process is shown visual. Note: This section can be deleted completely, but I would not recommend doing it to novice users - sometimes it can be very useful for quickly resetting a laptop or computer to the factory state, even when Windows is not loaded.
- How to Delete (Hide) System Recovery Recovery System in Windows 10 (by 584 MB or similar volume, plus video instructions)
- How to remove the PC or laptop manufacturer restore section (10 or more GB, often has a recovery name)
How to remove the "Restore" disk in Windows 10 Explorer (Hiding the recovery system section)

If after updating Windows 10, the system transfer to SSD or another hard disk in the conductor a disk appeared with the name "Restore", and sometimes simply "local disk" with a size of 584 MB or next to this number is a disk with the Windows 10 recovery environment. It is located on a single system disk, it is not necessary to delete it, but you can hide it:
- Go to "Disk Management", for this press Win + R keys on the keyboard and enter diskmgmt.msc.
- Look at the disc management, at which the recovery section is located on the disks, we need a disk number (for example, disc 0). The letter of the recovery partition in drive control is not always displayed, but it can be determined by size and inscriptions "Recovery section".

- Run the command prompt on behalf of the administrator. In Windows 10, you can dial "Command Line" in the search for the taskbar, then click on the Right Mouse button on the result and select "Run on the name of the administrator."
- In the command line in order, enter the commands by pressing ENTER after each:
- diskpart.
- SELECT DISK N. (N Replace on the number of the 2nd step)
- List Partition (The list of partitions on the disk is displayed, we need the section "Restore" section, hereinafter - M).

- SELECT PARTITION M.
- REMOVE Letter = Z (Z should be replaced with the drive letter to be hidden from the conductor).

This procedure will be completed and the recovery section will be successfully hidden.
Several notes on the method of hiding the built-in recovery section:
- If the recovery section appeared in the explorer after transferring Windows 10 to another disk or several of them appeared, then you may also have a disk partition that is no longer needed and not needed: If you wish, you can delete it, provided you know , what you are doing.
- Theoretically, the method described can be simplified to DiskPart - List Volume, as described in the following method, but in the latest versions of Windows 10, the recovery sections may not be displayed in the volume list (List Volume), therefore I described the method that contains more steps, but guaranteed Allows you to remove an unnecessary disk from the conductor.
Hiding the Windows 10 Recovery section - Video Instructions
How to remove the manufacturer restore partition from the conductor using the command line
Now about the methods of hide the recovery section from the manufacturer, we are talking about 584 MB in Windows 10, but a section with a backup system by 10 or more GB with a backup copy of the OS, which is present on some laptops and computers.
The first way to hide the recovery partition is to use the DiskPart utility on the command prompt. The way, probably, is more complicated than the second described further in the article, but it is usually more efficient and triggers almost in all cases.
Steps to hide the recovery partition will be the same in Windows 10, 8 and Windows 7.
- Run the command line or PowerShell on behalf of the administrator (see how to run the command prompt on the administrator name). In the command line, enter the following commands.
- diskpart.
- List Volume (As a result of the execution of this command, a list of all sections or volumes on the disks will be displayed. Pay attention to the section number to be removed and remember it, then this number will be indicated as n).
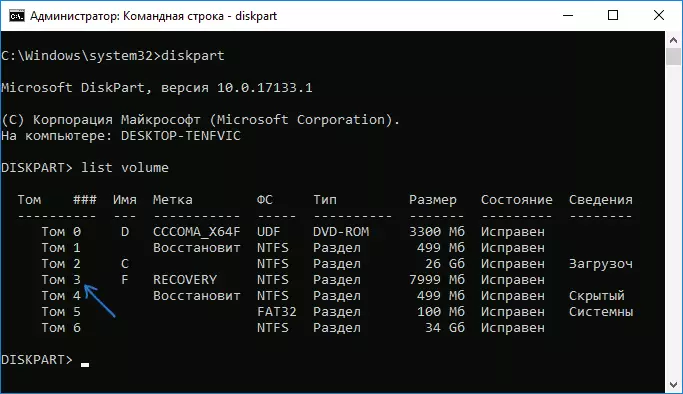
- SELECT VOLUME N.
- Remove Letter = letter (where the letter - the letter, under which the disk is displayed in the conductor. For example, the command may have a view of the remove letter = f)

- EXIT.
- After executing the last command, close the command line.
On this, the whole process will be completed - the disk will disappear from Windows Explorer, and with it and notifications are notified that there is not enough free space on the disk.
Using the Disk Management utility
Another way is to use the "Disk Management" utility built in Windows, but it does not always work in the situation under consideration:
- Press Win + R keys, enter diskmgmt.msc and press ENTER.
- Right-click on the recovery section (you are most likely to be located in the same place that I have in a screenshot, determine it by the letter) and select the "Change the letter of the disc or the path to the disk in the menu."
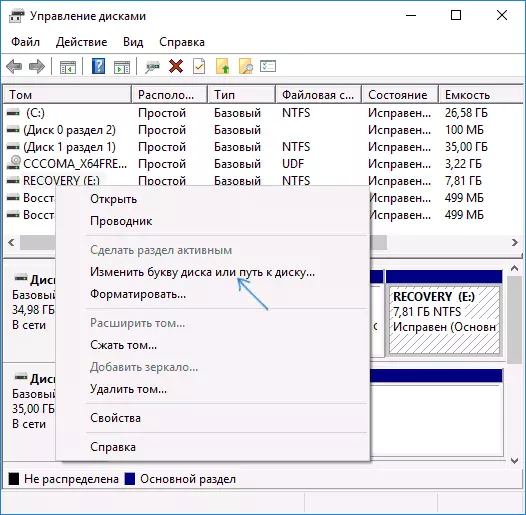
- Select the drive letter and click "Delete", then - OK and confirm the removal of the drive letter.
After performing these simple steps, the drive letter will be deleted, and it will stop displaying in Windows Explorer. At the end - video instruction, where both ways to remove the recovery partition from Windows Explorer show visual.
I hope the instruction was useful. If something does not work, tell us about the situation in the comments, I will try to help.