

In this article, we will talk about how to make the Internet connected automatically immediately after the computer is turned on. This is not difficult. The methods described in this manual are equally suitable for Windows 7 and Windows 8.
Use Windows Task Scheduler
The most reasonable and easy way to configure automatic Internet connection when you start Windows - use the task scheduler for these purposes.

The fastest way to start the task scheduler is to use the search for Windows 7 or search menu on the Windows 8 and 8.1 initial screen. You can also open it through the Control Panel - Administration - Task Scheduler.
In the scheduler, follow these steps:
- In the right menu, select "Create a simple task", specify the name and description of the task (optional), for example, automatic start of the Internet.
- Trigger - when entering Windows

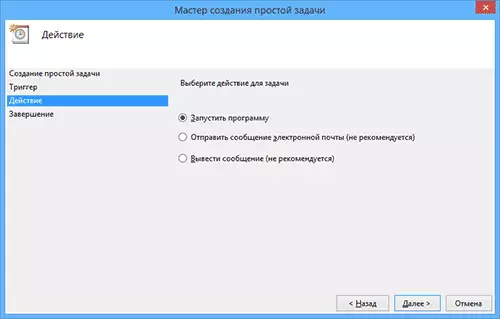
- Action - Run the program
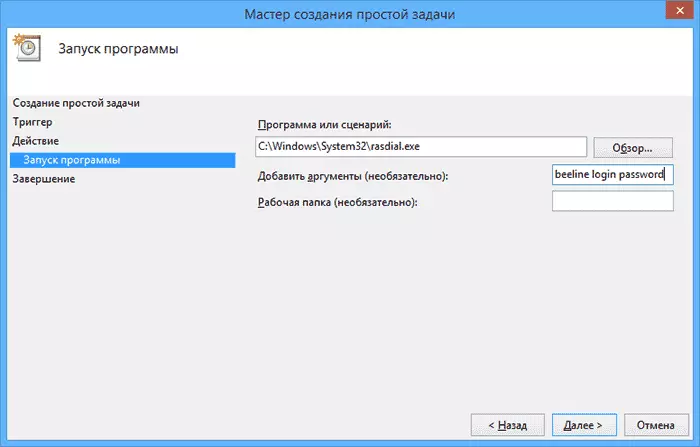
- In the Program or script field, enter (for 32-bit systems) C: \ Windows \ System32 \ rasdial.exe or (for x64) C: \ Windows \ syswow64 \ rasdial.exe, and in the "Add Arguments" field - "file_name login Password "(without quotes). Accordingly, you need to specify your connection name if it contains spaces, take it in quotes. Click "Next" and "Finish" to save the task.
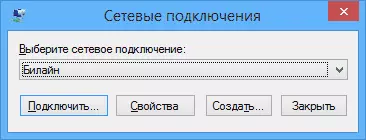
- If you do not know which connection name to use, press the Win + R keys on the keyboard and enter the Rasphone.exe and look at the names of the available connections. The connection name must be on the Latin (if it is not so, rename it pre-).
Now, whenever, after turning on the computer and at the next login in Windows (for example, if it was in sleep mode), the Internet will connect automatically.
Note: If you wish, you can use a different command:
- C: \ Windows \ System32 \ Rasphone.exe -D_name
Automatic internet start using the registry editor
The same can be done with the help of the registry editor - it is enough to add an Internet connection setting to autorun in the Windows registry. For this:
- Run the Windows Registry Editor, for which press Win + R keys (Win - key with the Windows emblem) and enter the REGEDIT in the "Run" window.
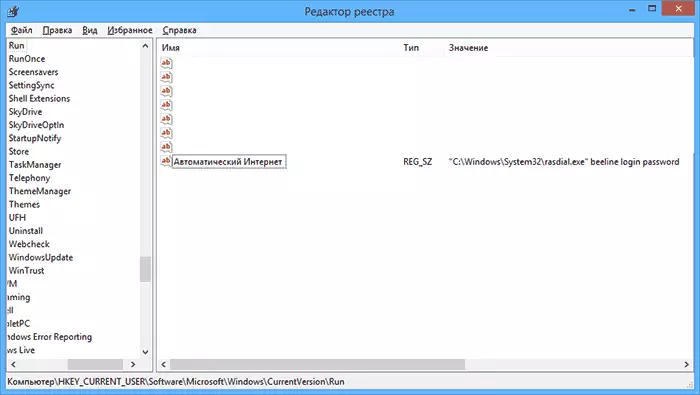
- In the Registry Editor, go to the HKEY_CURRENT_USER \ SOFTWARE \ Microsoft \ Windows \ Currentversion \ Run section (folder)
- On the right side of the registry editor, right-click in a free place and select "Create" - "String Parameter". Enter any name for it.
- Right-click on the new parameter and select "Edit" in the context menu
- In the "Value" field, enter "C: \ Windows \ System32 \ Rasdial.exe" Connection Name Login Password "(see Screenshot, about quotes).
- If the connection name contains spaces, take it in quotes. You can also use the "C: \ Windows \ System32 \ Rasphone.exe -D" name_name.
After that, save the changes, close the registry editor and restart the computer - the Internet will have to connect automatically.
Similarly, you can make a shortcut with the automatic Internet connection command and place this label to the "Start" menu.
Good luck!