

Update 2016: New ways are added to split the disk (hard or SSD) to two or more, also added video how to split the disk in Windows without programs and in the Aomei Partition Assistant program. Posted in management. Separate instructions: How to split the disk to sections in Windows 10.
See also: How to split the hard disk during installation of Windows 7, Windows does not see the second hard disk.
You can split the hard disk in several ways (see below). The instructions examined and described all these methods, their advantages and disadvantages are indicated.
- In Windows 10, Windows 8.1 and 7 - without the use of additional programs, standard means.
- During the installation of the OS (including, it will be considered how to do this when installing XP).
- Using free MiniTool Partition Wizard, Aomei Partition Assistant, as well as Acronis Disk Director.
How to split the disk in Windows 10, 8.1 and Windows 7 without programs
You can split the hard disk or SSD in all the latest versions of Windows in the already installed system. The only condition is that free space on the disk is no less than you want to highlight under the second logical disk.
To do this, do the following steps (in this example, the system disk C) will be broken:
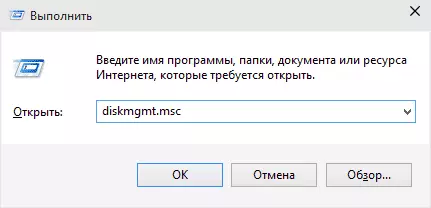
- Press the Win + R keys on the keyboard and enter the diskmgmt.msc to the "Run" window (Win key is the one with the Windows emblem).
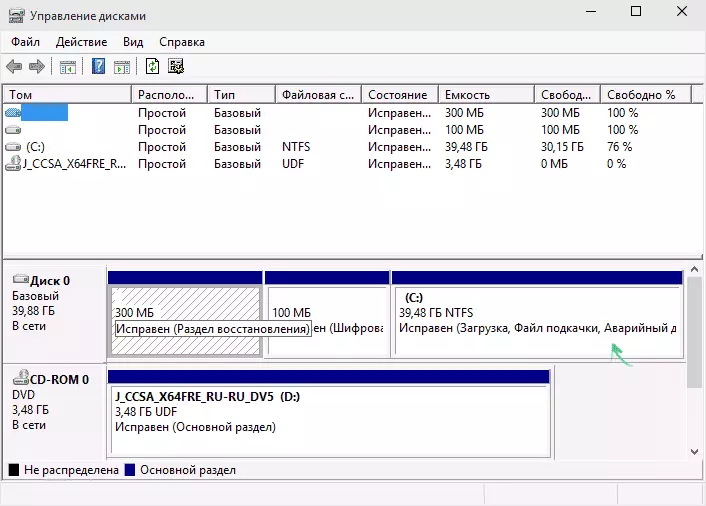
- After downloading the disk management utility, right-click on the section corresponding to your C drive (or another to be divided) and select the menu item "SHRAT TOM".
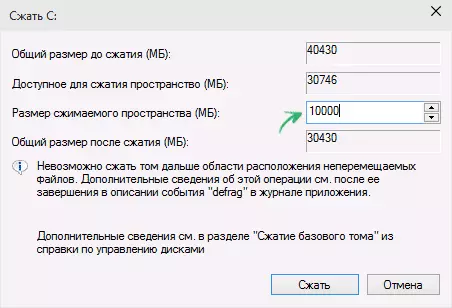
- In the volume compression window, specify in the "Size of the compressible space" field, the size you want to highlight for a new disk (logical partition on the disk). Click the "Compress" button.
- After that, the space that "not distributed" appears to the right of your disk. Click on it right-click and select "Create a simple volume".

- The default for a new simple volume is the size equal to the entire unoccupied space. But you can specify less if you want to create multiple logical disks.
- In the next step, specify the letter of the disc created.
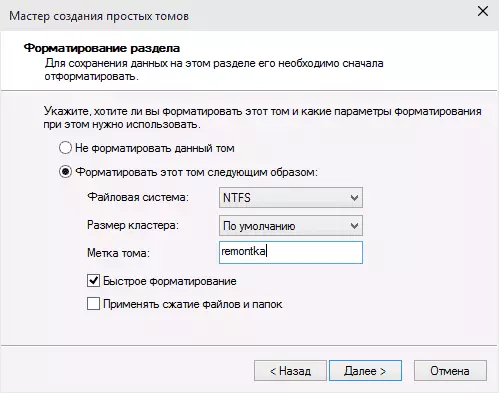
- Set the file system for the new partition (it is better to leave everything as it is) and click "Next".
After these actions, your disk will be divided into two, and the newly created will receive its letter and will be formatted into the selected file system. You can close "Disk Management" Windows.
Note: It may turn out that later you want to increase the size of the system partition. However, this will not work in the same way due to some limitations of the considered system utility. You will help you how to increase the C drive.
How to split the disk to partitions on the command line
Smash the hard disk or SSD into several partitions can not only be "driven drives", but also using the Windows 10, 8 and Windows 7 command line.
Be careful: The example shown later will work without problems only in cases where you have a single system partition (and possibly a pair of hidden) to be divided into two partitions - under the system and data. In some other situations (the MBR disk and already have 4 partitions, with a decrease in the disk, "after which" is another disc) it can work unexpectedly if you are a starting user.
The following steps are shown how to split the C disk into two parts on the command line.
- Run the command line on behalf of the administrator (how to do it). Then, enter the following commands.
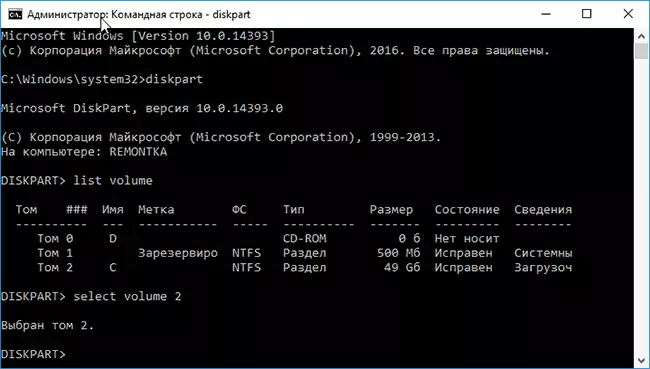
- diskpart.
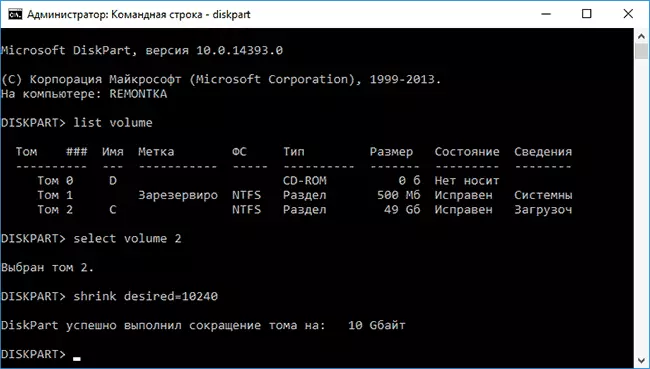
- List Volume (as a result of the execution of this command, pay attention to the volume number corresponding to the C disc)
- SELECT VOLUME N (where n is the number from the previous item)
- shrink desired = size (where size is the number specified in megabytes to which we will reduce the C disc to break it into two disks).
- List Disk (here Note the number of the HDD or SSD physical disk number on which C section C).
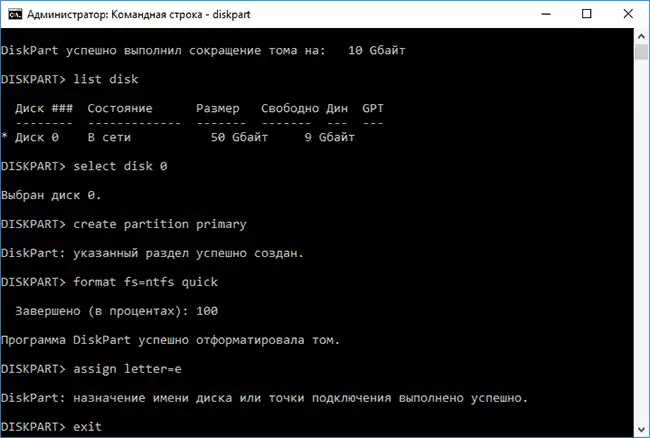
- SELECT DISK M (where M is the disk number from the previous item).
- CREATE PARTITION PRIMARY.
- Format FS = NTFS Quick
- Assign Letter = Desired_Buck_Disk
- EXIT.
Ready, you can now close the command line: in Windows Explorer you will see a newly created disk or, or rather, the disc partition with the letter you specified.
How to split disc to sections in the Minitool Partition Wizard Free program
Minitool Partition Wizard Free is an excellent free program that allows you to manage partitions on disks, including one partition to two or more. One of the advantages of the program is that an ISO boot image is available on the official website, which can be used to create a loading flash drive (developers are recommended to do this with RUFUS) or to record a disk.
This makes it easy to perform actions to split the disk in cases where it fails on the running system.
After downloading in the Partition Wizard, it will be enough for you to click on the disk to be divided, right-click and select the "Split" item (split).

Further steps are simple: Configure partition dimensions, click OK, and then press the "Apply" button on the left at the top to apply the changes made.
You can download the download image of ISO Minitool Partition Wizard Free from the official site https://www.partitionwizard.com/partition-wizard-bootable-cd.html
Video instruction
Also recorded the video on how to split the disk in Windows. It shows the process of creating partitions by standard means of the system, as described above and using a simple, free and convenient program for these tasks.How to split the disk during installation of Windows 10, 8 and Windows 7
The advantages of this method include its simplicity and convenience. Breaking to the same takes relatively little time, and the process itself is very visual. The main disadvantage is to apply the method only when installing or reinstalling the operating system, which in itself is not very convenient, besides there is no possibility of editing partitions and their size without HDD formatting (for example, when the system partition ended, the user wants Add some space from another partition of the hard disk). In more detail, creating partitions on the disk when installing Windows 10 is described in the article Setup Windows 10 from a flash drive.
If these shortcomings are not critical, consider the disk breaking process during the installation of the OS. This instruction is fully applicable when installing Windows 10, 8 and Windows 7.
- After starting the installation program, the bootloader will offer to select the partition to which the OS will be installed. It is in this menu that you can create, edit and delete the hard disk partitions. If a hard disk is not broken before that, one partition will be proposed. If it was broken - you need to remove those sections whose amount is required to redistribute. In order to configure the hard disk partitions, click the appropriate link at the bottom of their list - "Disc Setup".

- To delete hard disk partitions, use the appropriate button (reference)

Attention! When removing disk partitions, all the data will be deleted on them.
- After that, create a system partition by clicking "Create". In the window that appears, enter the volume of the section (in megabytes) and click "Apply".

- The system will propose to highlight a little space for the backup area, confirm the request.
- Similarly, create the required number of sections.

- Next, select the section to be used for Windows 10, 8 or Windows 7 and click Next. After that, continue the installation of the system as usual.
We divide the hard disk when installing Windows XP
During the development of Windows XP, an intuitive graphical interface was not created. But at least control and occurs through the console, divide the hard disk when installing Windows XP is also simple, as when installing any other operating system.Step 1. Delete existing sections.
You can redistribute the disk during the definition of the system partition. It is required to divide the section for two. Unfortunately, Windows XP does not allow this operation without formatting a hard disk. Therefore, the sequence of actions is as follows:
- Allocate the section;
- Click "D" and confirm the deletion of the section by pressing the "L" button. When you delete the system partition, you will also be asked to confirm this action using the ENTER button;

- The section is deleted and you get an unbalanced area.
Step 2. Create new sections.
Now you need to create the necessary partitions of the hard disk from the unintended area. It is done quite simple:
- Press the "C" button;

- In the window that appears, enter the required partition size (in megabytes) and click ENTER;

- After that, the new section will be created, and you will return to the system disk definition menu. Similarly, create a necessary number of sections.
Step 3. Determine the file system format.
After the sections are created, select the section that must be systemically and press Enter. You will be prompted to select the file system format. Fat-format is more outdated. You will not have problems with compatibility, for example, Windows 9.x, however, due to the fact that the system of XP today is a rarity, this dignity does not play a special role. If also consider that NTFS is faster and reliable, allows you to work with files of any volume (FAT - up to 4GB), the choice is obvious. Choose the desired format and click ENTER.Further, the installation will go in the standard mode - after formatting the partition, the installation of the system will begin. You will only be required to enter custom parameters at the end of the installation (computer name, date and time, time zone, etc.). As a rule, this is done in a convenient graphic mode, so it does not represent difficulties.
Free Aomei Partition Assistant
Aomei Partition Assistant is one of the best free programs to change the partition structure on the disk, the system transfer with the HDD on SSD and, including, can be divided into two or more disk. At the same time, the program interface in Russian, in contrast to another good similar product - Minitool Partition Wizard.
Note: Despite the fact that Windows 10 support is stated in the program, in this system it has not been fragments for some reason, but no failures have happened (I think, by July 29, 2015 should correct). In Windows 8.1 and Windows 7, it works without problems.
After starting the Aomei Partition Assistant, in the main program window you will see connected hard drives and SSDs, as well as sections on them.
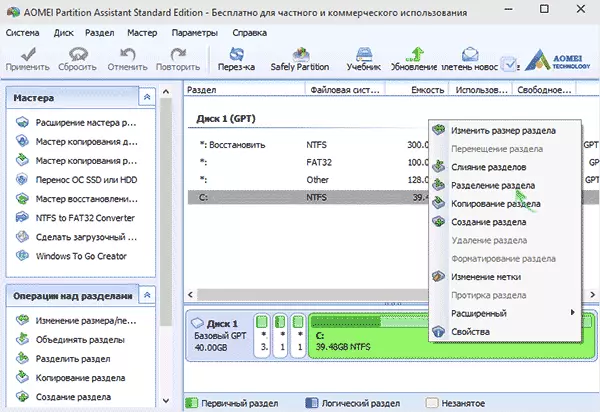
To split the disk, click on it with the right mouse button (in my case by C), and select the section "Section Section" menu.
In the next step, it will be necessary to specify the size of the section being created - this can be done by entering the number, or by moving the separator between the two disks.
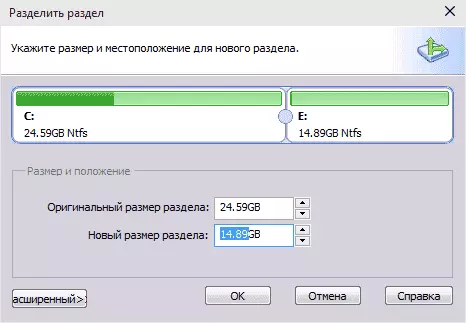
After you click OK, the program will be displayed that the disc is already divided. In fact, it is not so - to apply all the changes made, you must click the "Apply" button. After that, you can be warned that the computer will reboot to complete the execution of the operation.

And after rebooting in your explorer, you can observe the result of separation of discs.
Other programs for creating hard disk partitions
To split the hard disk there is a huge number of different software. It is like commercial products, for example, from Acronis or Paragon and distributing on a free license - Partition Magic, Minitool Partition Wizard. Consider dividing the hard disk using one of them - Acronis Disk Director programs.
- Download and install the program. When you first start, you will be prompted to choose the mode of operation. Choose "manual" - it is more customizable and works more flexibly than "automatic"
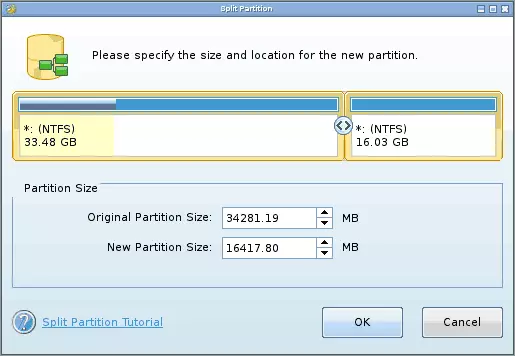
- In the window that opens, select the section you want to split, right-click on it and select "Divide TOM"

- Set the size of the new section. It will be deducted from that volume that is broken. After setting the volume, click "OK"
- However, this is not all. We only simulated a disk breakout scheme to implement a reality plan, you need to confirm the operation. To do this, click "Apply Waiting Operations". The creation of a new section will be started.

- A message will be displayed about the need to restart the computer. Click "OK", after that the computer will restart and a new section will be created.
How to break the hard disk in macos x full-time
You can drive a hard disk, without reinstalling the operating system and not put an additional software on your computer. In Windows Vista and above the disk utility is built into the system, there are also cases in Linux and MacOS.
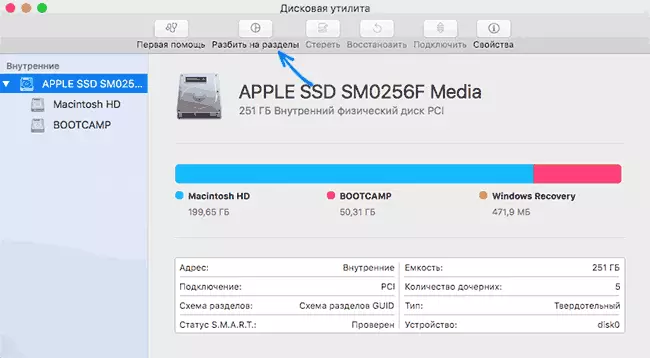
To run a disk breakdown in Mac OS, do the following:
- Run the disk utility (for this, select "Software" - "Service Programs" - "disk utility") or find it using Spotlight search
- On the left, select a disk (not partition, namely the disc) to be divided into partitions, click the split button on the section above.
- Under the volume list, press the + button and specify the name, file system and the volume of the new partition. After that, confirm the operation by pressing the "Apply" button.
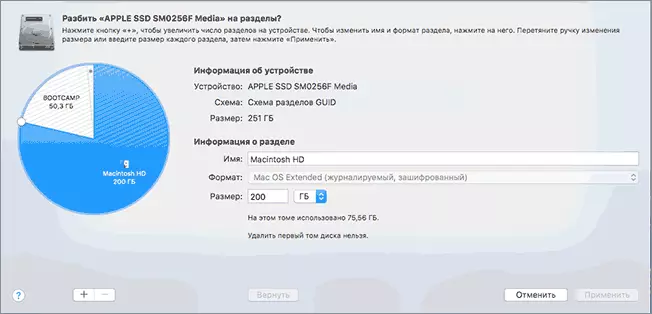
After that, after a short (in any case, for the SSD) section of the creation of the section, it will be created and accessible in Finder.
I hope the information will be useful, and if something does not work as expected or have any questions, you will leave a comment.