

In some cases, it may be necessary to change the public network for private or private on publicly available - about how to do it in Windows 10 and will be discussed in this instruction. Also at the end of the article you will find some additional information about the difference in two types of network and which is better to choose in various situations.
Note: Some users also ask how to change the private network to home. In fact, the private network in Windows 10 is the same as the home network in previous versions of the OS, the name simply changed. In turn, the public network is now called publicly available.
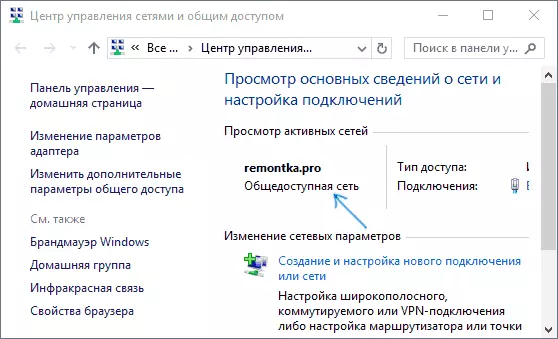
To see which type of network in Windows 10 is currently selected, you can, opening the network and access control center (see how to open the network management center and shared access in Windows 10).
In the "View Active Networks" section, you will see a list of connections and which network layout for them is used. (It may also be interested in: how to change the network name in Windows 10).
The easiest way to change Windows 10 network connection profile
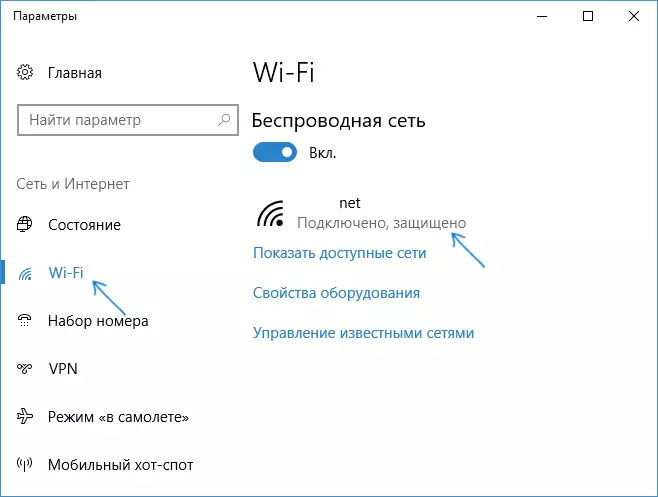
In the latest versions of Windows 10, a simple configuration of the connection profile appeared in the network parameters, where you can choose, publicly available network or private:
- Go to the parameters - the network and the Internet and click the "Properties" button (in the latest 10-ki version) or select "Change Connection Properties" on the Status tab. Instead of the status tab, you can open the Ethernet or Wi-Fi tab, depending on which network type is required to change.

- Install the public network or publicly available.

Video instruction
In case, for some reason, this option did not work or you have another version of Windows 10, where the parameters look different, you can use one of the following ways.Changing a private network to publicly available and back for local Ethernet connection
If your computer or laptop is connected to the network cable, to change the network location with the "private network" to the "public network" or vice versa, follow these steps:
- Click the connection icon in the notification area (normal, left mouse button) and select "Network Settings".

- In the window that opens in the left pane, click on the Ethernet item, and then click on the name of the active network (to change the network type it must be active).

- In the next window with network connection options in the "Make this Computer Available For Detection" section, set "Off" (if you want to enable the "Public Network" profile or "On" if you want to select "Private Network").

Parameters must apply immediately and, accordingly, the network type will change after their use.

Changing the type of network for Wi-Fi connections
In fact, in order to change the type of network with publicly available on particular or back for wireless Wi-Fi connection in Windows 10, you should perform the same steps as for Ethernet connections that differ only on the action at the 2nd step:
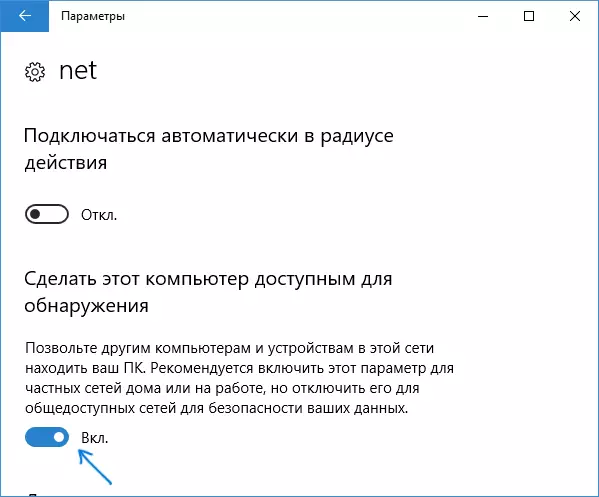
- Click the wireless connection icon in the taskbar notification area, and then on the "Network Settings".
- In the parameters window in the left pane, select "Wi-Fi", and then click on the name of the active wireless connection.
- Depending on whether it is necessary to change the public network to a private or private on the public, turn on or turn off the switch in the "Make this computer available for detection" section.
Network connection parameters will be changed and when you again enter the network management center and shared access, it will be possible to see that the active network has the desired type.
How to change the public network for private using the Windows 10 home group settings
There is another way to change the type of network in Windows 10, but it only works in cases where you need to change the network location with a "public network" to the "private network" (i.e., only in one direction) and only in earlier versions of the OS (Now the home group was removed in the system).
Steps will be as follows:
- Start typing in the search panel "Home Group" (or open this item in the control panel).

- In the Parameters of the Home Group, you will see a warning that you want to install the "Private" to the location of the computer on the network. Click "Changing the location in the network."

- The left panel opens, as when you first connect to this network. In order to enable the "Private Network" profile, you answer "Yes" to request "You want to allow other computers in this network to detect your PC."

After applying the parameters, the network will be changed to "private".
Reset network parameters and subsequent selection of its type
Selecting a network profile in Windows 10 occurs when you first connect to it: you see a request for whether to allow other computers and devices in the network to detect this PC. If you choose "Yes", a private network will be enabled if you press the "No" button - the public network. If you connect to the same network, the location selection does not appear.
However, you can reset the Windows 10 network settings, restart the computer and then the request will appear again. How to do it:
- Go to the Start - Parameters (gear icon) - a network and the Internet and on the Status tab, click on "Reset Network".
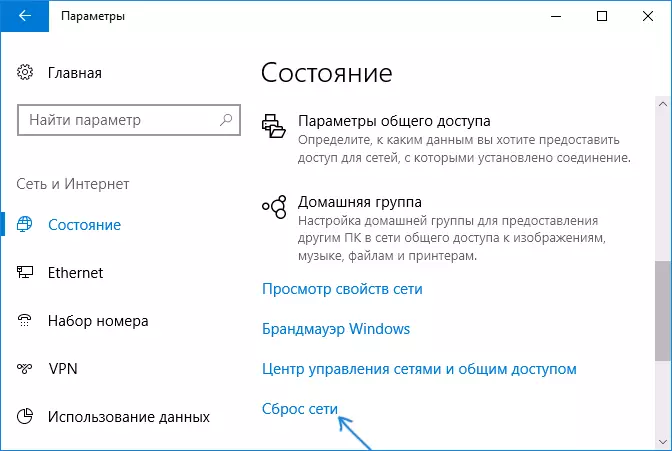
- Click the "Reset Now" button (Read more about reset - how to reset Windows 10 network settings).

If after that, the reboot of the computer will not automatically happen, run it manually and when you connect to the network, you will again see a request for whether to enable network detection (as in the screenshot in the previous method) and, in accordance with your choice, the network type will be installed.
Additional Information
At the end of some nuances for novice users. It is often necessary to meet the following situation: the user believes that the "private" or "home network" is safer than the "publicly accessible" or "public" and it is for this reason that it wants to change the type of network. Those. It assumes that under the accessibility it is understood that access to his computer may appear from someone outsider.
In fact, everything is exactly the opposite: when you select a "publicly accessible network", Windows 10 applies more secure parameters, disconnecting a computer detection, sharing files and folders.
When choosing "publicly available", you inform the system that this network is not controlled by you, and therefore may pose a threat. And vice versa, when choosing "Private", it is assumed that this is your personal network in which only your devices work, and therefore it turns on to network detection, sharing folders and files (which, for example, makes it possible to play video from a computer on your TV See DLNA server Windows 10).
At the same time, if your computer is connected directly to the network cable provider (ie not through a Wi-Fi router or the other, your own, a router), I would recommend to include a "social network", because despite the fact that the network "Located at home", it is not homely (you are connected to the equipment of the provider to which, at least, other your neighbors are connected and, depending on the settings of the provider's router, they canoretically access your devices).
If necessary, you can disable network detection and sharing files and printers and for a private network: To do this, in the Network and Shared Access Center, click on the left "Change Additional Sharing Options", and then specify the necessary settings for the "Private" profile.