

Note: in Windows 10 and 8 for devices that are defined as a media device, the safe extraction icon is not shown (players, android plates, some phones). You can disable them without using this feature. Also consider that in Windows 10, the display of the icon can be disabled and in the parameters - personalization - the taskbar - "Select the icons displayed in the taskbar".
Usually, in order to perform the safe removal of the device in Windows, you click on the corresponding icon about the clock right-click and do it. The assignment of the "Safe Extraction" is that when using it, you inform the operating system that you intend to extract this device (for example, a USB flash drive). In response to this, Windows completes all operations that can lead to damage. In some cases, also stops supplying the power to the device.
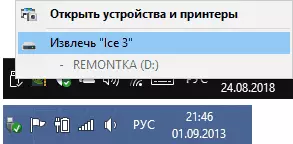
If you do not use secure device extraction, it can lead to data loss or damage. In practice, it happens infrequently and there are certain things you need to know and take into account, see: When you should use a safe removal of the device.
How to return the safe extraction of flash drives and other USB devices automatically
Microsoft offers its own official utility "Automatically diagnose and troubleshooting problems with USB" to correct exactly the type of problem in Windows 10, 8.1 and Windows 7. The procedure for use is as follows:
- Run the downloaded utility and click Next.

- If necessary, check those devices for which safe extraction does not work (although the correction will be applied to the system as a whole).

- Wait until the operation is completed.
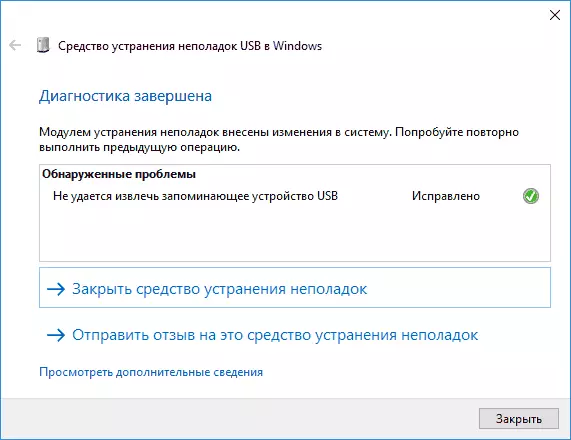
- If everything passed successfully, the flash drive, an external disk or other USB device will be extracted, and in the future the icon will appear.
Interestingly, the same utility, although does not report this, corrects and constantly displaying the safe removal icon in the Windows 10 notification area (which is often displayed even when nothing is connected). You can download the automatic device for automatic diagnostics of USB devices from the Microsoft website: https://download.microsoft.com/download/d/b/b/dbbf8048-0817-40dc-817d-395652b870ff/winusb.diagcab.
How to return the "Safe Removing Device" icon

Sometimes, for unknown reasons, the safe extraction icon may abide. Even if you connect and turn off the USB flash drive again and again, for some reason, the icon does not appear. If this happened and you have (and it is most likely so, otherwise you would not come here), press the Win + R buttons on the keyboard and enter the following command to the "Run" window:
Rundll32.exe shell32.dll, Control_rundll Hotplug.dllThis command works in Windows 10, 8, 7 and XP. The absence of a gap after the comma is not an error, it should be. After starting this command, the Safe Removing Device dialog box, which you were looking for.

Dialog Secure Extraction in Windows
In this window, you can, as usual, select the device you want to disable and click the "Stop" button. The "side" effect of the execution of this command is that the safe extraction icon appears again where it is allowed to be located.
If it continues to disappear and every time you need to re-execute the specified command to extract the device, then you can create a shortcut for this action: right-click on an empty desktop location, select "Create" - "Label" and in the "Object Location field" »Enter the command to call the secure removal dialog. At the second stage of creating a shortcut, you can give him any desired name.
Another way to safely extract the device in Windows
There is another simple way that allows you to use the safe removal of the device when there is no icon on the Windows taskbar:
- In My Computer, right-click on the connected device, click "Properties", then open the "Equipment" tab and select the desired device. Click the "Properties" button, and in the window that opens, "Change Parameters".
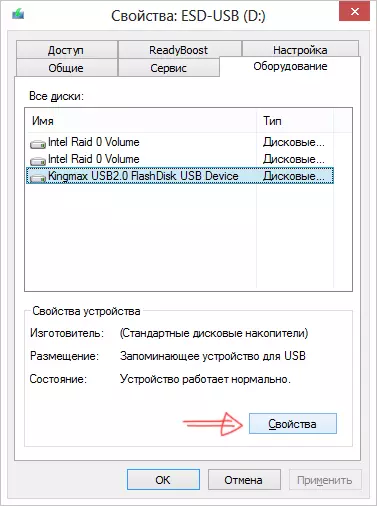
Properties of connected drives
- In the next dialog box, click the "Politics" tab and already on it you will find the link "Safe Removing Device", which you can use to start the desired feature.

I complete the instructions. I hope the ways listed here are safely removing the portable hard disk or flash drive will be sufficient.