

In this manual, it is detailed how to transfer Windows 10 to SSD using Acronis True Image (Suitable for other OS versions), possible problems when transferring, as well as video demonstration of the process.
- Transferring Windows 10 on SSD in Acronis True Image
- Video instruction
- Where to download Acronis True Image for SSD different brands
- Possible problems and decision methods
Transferring SSD System in Acronis True Image
Regardless of which exactly the version of Acronis True Image to transfer Windows from a hard disk on SSD you use, the transfer steps will be almost the same:
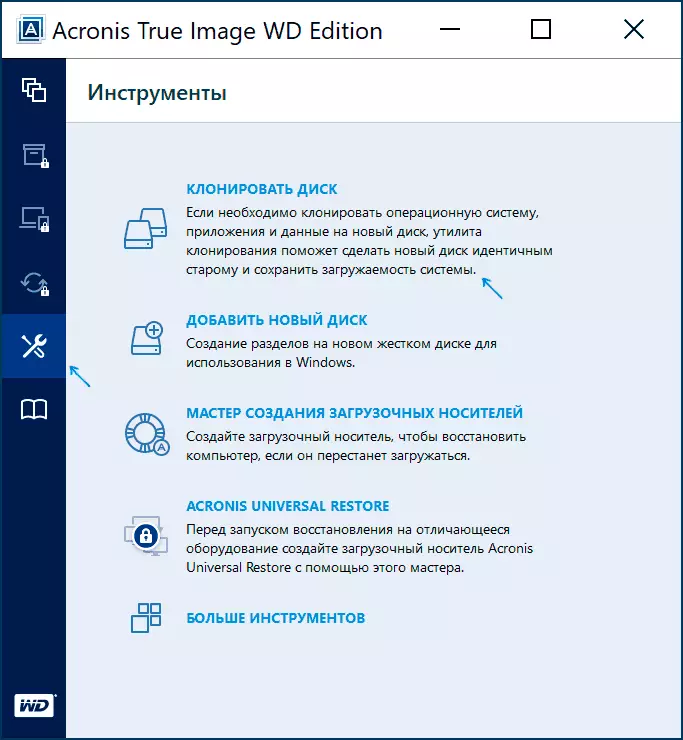
- In the "Tools" program section, click "Cloning Disc".
- Select cloning option: "Automatic" is simpler - it will be enough to select the original and target disk, as well as if necessary, exclude individual cloning files. "Manual" is slightly harder, and consider it.

- Select the source disk - the one from which the system cloning is performed.

- Select the target disk - your SSD to which you carry the operating system.
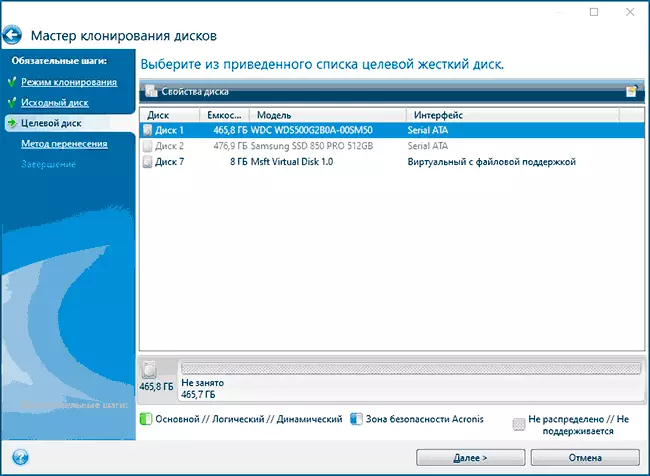
- Consider that all data and sections from the target disk will be deleted, you will be warned about this.
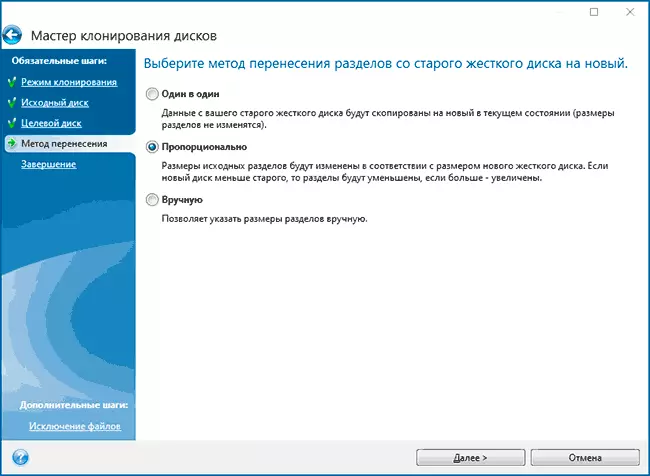
- Select the transfer method. The best option is "proportional." The "one to one" method may not be suitable in the difference in the size of the source and target drives, and the "manually" is not quite for beginners. All three methods explained in more detail in the video below.
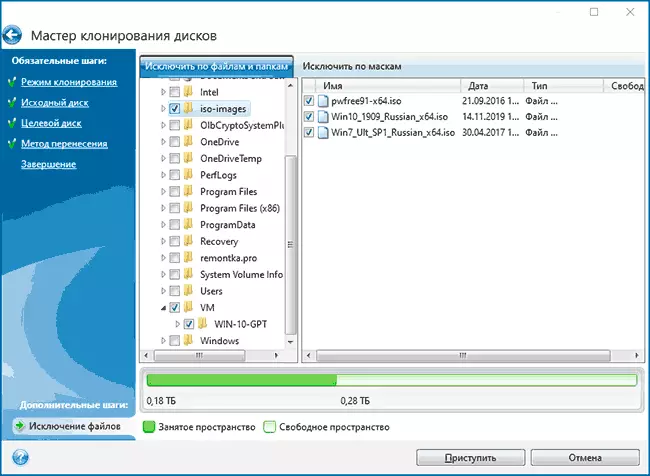
- By clicking the "File Exclusion" item on the left below you can mark those folders and files that you do not need to be transferred to SSD to free up the place on it. It will be reasonable not to transfer downloads, a basket, and possible and some other not too important data.
- Click the "Start" button, the system cloning process to another disk will begin. If you inform you to restart the computer, reboot it. Consider: if after rebooting you see only a black screen (what happened in my experiment), it is quite possible, the transfer goes and it is better to wait a couple of hours (depending on the speed of the source disk and its volume), and not turn off the computer, otherwise you can harm SSD.
- After completing the transfer process, the system will automatically restart, and the download will be executed from that disc, which from the "point of view" of the BIOS / UEFI is the first. If this is not the same disk from which it was necessary to download, specify the desired (presumably, new SSD) in the BIOS download parameters. If suddenly you do not work, look, whether there is a separate setting of the order of hard drives in the BIOS. If such items are not found, it can help simply switch disks in places in a computer or laptop (provided that they have the same connection interface).
Usually everything passes smoothly, however, if something does not work or in the process, the program reports errors, the common case is considered in the appropriate section further in the instructions.
How to transfer Windows to another disc in Acronis True Image - Video
Where to download and how to install Acronis True Image for SSD a certain brand
If you have SSD one of the specified manufacturers, download the free version of Acronis True Image You can:- For WD and SanDisk disks - Acronis True Image WD Edition https://support.wdc.com/downloads.aspx?lang=RU (the program starts if the computer is connected to the disc of the specified brands).
- For kingston -HttpS: //www.kingston.com/ru/Support/Technical/acronis-Download - the key for Acronis True Image is usually complete with a purchased drive.
- For ssd crucial - https://www.acronis.com/en-us/promotion/crusialhd-download/
- For A-Data - https://www.adata.com/ru/SSSoftware-5/ (load Acronis True Image OEM, you may need to register your SSD A-DATA on the same page).
Possible problems when transferring the system
Among the frequent problems that may occur when cloning Windows on SSD in Acronis True Image:
- Acronis True Image does not start and reports that there is no SSD the desired brand. It happens if you have connected a new disk and did not initialize it. Initialize in "Drink Management" - Press Win + R, enter diskmgmt.msc and follow the instructions (initialization will be offered automatically, or you will need to right-click on the disk with the image of the Red Arrow). Selecting partition table is not important, it is not required to format the disk.
- When transferring Acronis True Image reports that there is not enough space on the target disk. This is possible for various reasons: Files from the source disk cannot be placed on the target (then you need to exclude more data from the transfer), you selected one-to-one transfer mode, but the sections of the source disk are not placed on the target (regardless of the occupied place on them ). The same error occurs and when encryption is enabled for the source disk. Solution - either decrypt the disk, or create a boot drive Acronis (on the Tools tab) and take cloning from it.
- After rebooting Acronis True Image Black Screen. The best solution is nothing and wait, perhaps for a long time. If, after a very long period of time, nothing happened, you can turn off the computer by long holding the power button (but it is not safe in this case) and try to disable Secure Boot to BIOS.
At the end of another moment: if you have successfully transferred the system and in the near future you do not plan to use the program, I recommend to delete it - it creates its own services and points in autoloads that you are most likely not needed.