

These instructions about how to create a bootable USB drive or a dual boot to boot in UEFI and Legacy (BIOS) modes in the program, especially the use of AIO Boot Creator, and some additional information. It may also be helpful: The best program to create a bootable USB drive.
- Preparing the USB flash drive or an external drive AIO Boot Creator
- Creating a multi-load flash drive
- Video instruction
Preparing a USB flash drive or an external drive AIO Boot Creator
Creating Dual USB drive using the AIO Boot Creator implies the preliminary preparation for the storage of ISO images and then place in it. Actions can be performed automatically or manually.
- Download AIO Boot Creator or from the official site (aioboot.com, which for some reason does not open), or with an official page on GitHub - https://github.com/nguyentumine/AIO-Boot/releases. On that page contains the following key files: 7z archive with AIOBoot to manually adjust the flash and AIO_BOOT_Extractor.exe for automatic recording of all necessary to stick. Archive password if required - aioboot
- If you downloaded the file and want to do everything manually, extract the contents of the file on a FAT32 USB flash drive so that the drive is the root folder, AIO turned out, EFI, and two executables.
- Then, run the file on a flash drive AIOCreator.exe, click «Bootloaders» Grub2 and install the boot loader.

- If you downloaded AIO Boot Extractor, in the general case for the preparation of FAT32 stick without its formatting is enough to run the program (if necessary turn on Russian language click the flag on the top right), select the drive, press Ok and wait for the completion of the process (for an external hard drive may be required check the "Use a hard drive").

- If you want to use NTFS and retain the ability to UEFI boot go to "Avtorazbienie", make the appropriate settings and click OK. In this case, the flash drive will be divided into sections, one of which - a small FAT32 will be used for loading, the other - the NTFS or ExFAT - to store images.

- Upon completion of the 3rd or the 4th step on the flash drive will be the same files as in the manual unpacking archive it.
Now a few notes:
- You do not need to create separate partitions FAT32 and NTFS. In case the image does not fit on FAT32, Aio Boot Creator will automatically break it into parts.
- This article mentions only the GRUB2 bootloader, as the most frequently used, but the program allows you to install other types of loaders on the USB flash drive.
Multi-load flash drive process
After the flash drive or external disk is prepared, you can add ISO boot images automatically or manually. To automatically add using Aio Boot Creator:
- Run from the flash drive file aiocreator.exe. If you used the splitting of the flash drive to the partitions, then run this file from the partition that is larger. If the Secure Boot option is enabled in the system, you will be reported that the secure load is enabled, it will interfere with the download from the flash drive on this computer and you will need to disable Secure Boot. The main window of the AIO Boot program looks like a screenshot below.

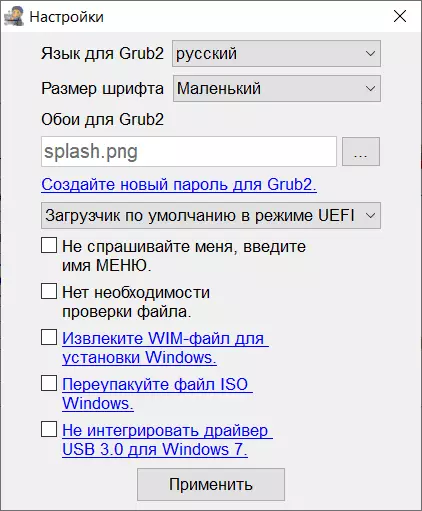
- I recommend to go to the "Settings" item and select the Russian language for GRUB2. There you can set the wallpaper for the menu and change other options.
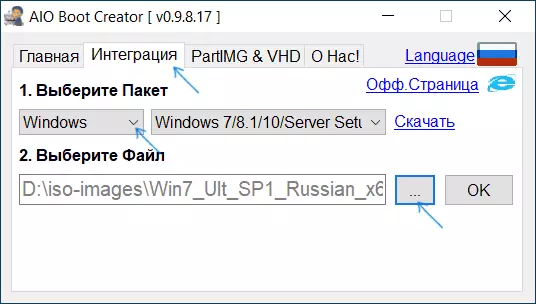
- Click the Integration tab, select which type of image you want to add to the USB flash drive, then specify the image file, click OK, enter how this image will be called in the menu when loading and wait for the addition of adding an image.
- If the flash drive is in the FAT32 file system, and the image of more than 4 GB, you will be informed about the ability to break it into parts automatically.
- In the same way, you can add additional images to install Windows 10, 8.1 and Windows 7, images of utilities and various LiveCD, anti-virus discs on your USB flash drive.
- If you want to check how menus and download looks like, you can go to "Tools" and select the QEMU Test Load item.

The menu when loading from the AIO Boot Creator flash drive in Russian will look something like this:

If you want to add images manually, without using the program interface, regardless of the specific image, you can add it to the folder Aio \ Files. on a flash drive.

After adding images to this folder, you can find them in the download menu in the "Loading from ISO, WIM, IMG, VHD and IMA.
Video instruction
The instructions are given only the basic actions to create a multi-load flash drive in the AIO Boot Creator program, in fact, it is significantly wider than: you can create a multi-load ISO image (in the "Tools" section), use the built-in utilities to create images, breakdown files and work with partitions, but, as a rule, most users use only the described method.