

Wi-Fi router D-Link DIR-300 NRU REV. B7.
If you have any of the routers D-Link, Asus, Zyxel or TP-Link, and Beeline, Rostelecom provider, House.ru or TTK and you never set up Wi-Fi routers, use this interactive Instructions for setting up Wi-Fi router
You like the owner of the Wi-Fi router D-Link DIR-300 NRU B5, B6. or B7. Apparently, you are experiencing any difficulties with the setting of this router. If you are also a client of an Internet provider Beeline , I will not be surprised that you are interested in how to configure the DIR-300 so as to eliminate the constant connection breaks. In addition, judging by the comments to the previous instructions, the technical support of Beeline says that Kohl Router is not purchased from them, they can support only with their own firmware, which is then not removed, and misleading, reporting that, for example, Dir- 300 B6 will not work with them. Well, let's look at how to configure the router in detail, step by step and with pictures; So that there are no disconnections and other problems. (Video instructions can be viewed here)
At the moment (Spring 2013) with the release of new firmware, a more relevant version of the manual here: Setting the router D-Link DIR-300
All photos in the instructions can be increased by clicking on them with the mouse.If it helps you (and it will definitely help) this instruction, I will convincingly thank me, having shared a link to it on social networks: links for this you will find at the end of the leadership.
For whom this instruction is intended
For the owners of the following models of D-Link routers (information about the model is available on the sticker located on the bottom of the device)- DIR-300 NRU REV. B5.
- DIR-300 NRU REV. B6.
- DIR-300 NRU REV. B7.
- PPPoe Connection for Rostelecom
- SNLYM (Onlime) - Dynamic IP (or static if there is an appropriate service)
- Stork (Tolyatti, Samara) - PPTP + Dynamic IP, step "Change LAN Address" required, VPN address Server - Server.avtograd.ru
- ... can write parameters in the comments for your provider and I will bring them here
Preparation for configuration

Firmware for DIR-300 on D-Link
Update from July 2013: Recently, all the available D-Link DIR-300 routers already have a firmware 1.4.x, so you can skip the steps to download the firmware and update it and go to the router setting below.
Since in the process of configuration, we will perform a router flashing, which will avoid many possible problems, as well as considering what you read this instruction, which means you have the Internet connected, first of all, you will download the latest firmware version from the FTP: // D- link.ru.
When you go to this site you will see the folder structure. You should go to Pub -> Router -> DIR-300_NRU -> Firmware -> and then to the folder corresponding to your hardware revision of the router - B5, B6 or B7. In this folder there will be a subfold with old firmware, a document warning that the firmware versions being installed must match the hardware revision of the router and the firmware file itself with the .bin extension. We download the latter in any folder on your computer. At the time of writing this instruction, the latest firmware versions - 1.4.1 for B6 and B7, 1.4.3 for B5. All of them are configured equally, which will be considered further.
Connect Wi-Fi Routher
Note: just in case, do not connect the Internet provider cable at this stage, to avoid any failures when changing the firmware. Do it immediately after a successful update.
The router is connected as follows: The Internet provider cable - to the Internet jack, which is included with the blue wire, one end to the computer's network card port, to one of the LAN connections on the rear panel of the router.
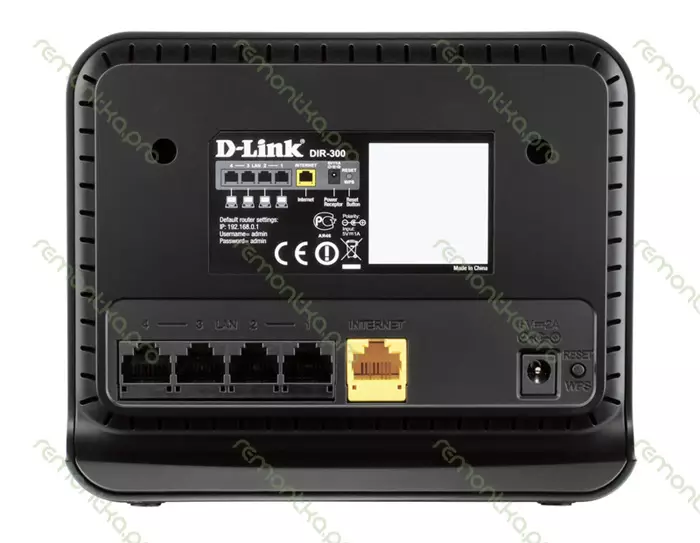
Wi-Fi router D-Link DIR-300 NRU REV. B7 Rear view
Configuration of the router can be made and not having a computer, and from a tablet or even a smartphone using only Wi-Fi access, but the firmware change is possible only with a cable connection.
LAN setting on a computer
You should also make sure that the connection settings are correct on the local network of your computer, if you are not sure which parameters are installed in it, be sure to do this step:- Windows 7: Start -> Control Panel -> View network status and tasks (or network management center and shared access, depending on the selection of the display option) -> Change the adapter parameters. You will see a list of connections. With the right mouse click on the "connection on a local network", then, in the context menu that appears, properties. In the list of connection components, select the "Internet version 4 TCP / IPv4" protocol, right click, then properties. In the properties of this connection, it should be set: to receive an IP address automatically, the DNS server addresses are also automatically as displayed in the picture. If it is not so, install the appropriate settings and click Save.
- Windows XP: All the same as for Windows 7, but the list of connections is in Start -> Control Panel -> Network Connections
- Mac OS X: Click on the apple, select "System Settings" -> Network. The connection configuration item must be "using DHCP"; IP addresses, DNS and subnet mask are not needed. Apply.

IPv4 settings for setting DIR-300 B7
Update firmware
If you have purchased a used router or have already tried to configure it yourself, I recommend to reset it before starting it to the factory settings by pressing and holding a thin RESET button on the rear panel for about 5-10 seconds.
Open any Internet browser (Internet Explorer, Google Chrome, Mozilla Firefox, Yandex.Bauzer, etc.) and enter the following address in the address bar: http://192.168.0.1 (and you can simply click on this link and choose " Open in the new tab "). As a result, you will see the login and password window to administer the router.
Usually on DIR-300 NRU Rev. B6 and B7 commercially available 1.3.0 firmware installed, and this window will look like this:

For DIR 300 B5, it may look as well as above, and may differ and have, for example, the following type for firmware 1.2.94:

Entrance DIR-300 NRU B5
We enter the same standard login and password (they are indicated on the sticker at the bottom of the router): admin. And we get to the settings page.

D-Link DIR-300 REV. B7 - Administration Panel
In the case of B6 and B7 with the firmware 1.3.0, you must go to "configure manually" -> System -> Update software. In B5 with the same firmware, everything is the same. For the earlier firmware of the B5, the path will be practically the same, except that you will not need to choose "configure manually".

The process of updating the firmware DIR-300 NRU
In the Field to select the updated file, click "Overview" and specify the path to the previously loaded Official D-Link firmware. Next, logical, "update". We wait for the end of the update, after which the following options are possible:
- You will see a message that the device is ready and you will be prompted to enter and confirm the new (not standard Admin password) to access the D-Link DIR-300 NRU settings. We introduce and confirm.
- Nothing happens, although, apparently, the update has already passed. In this case, simply go to 192.168.0.1 again, enter the default login and password and you will also be prompted to change them.
Setting firmware 1.4.1 and 1.4.3
Do not forget to connect the Internet provider cable before starting to configure the connection.12/24/2012 New firmware versions - 1.4.2 and 1.4.4 appeared on the official website, respectively. The setting is in the same way.So, in front of you page settings Wi-Fi router D-Link DIR-300 NRU with an updated firmware. You can set the Russian interface language by using the corresponding menu on the right above.
Setting up L2TP for Beeline

D-Link DIR-300 B7 with firmware 1.4.1
At the bottom of the main settings screen, select the extended settings and fall to the next page:
Extended settings on firmware 1.4.1 and 1.4.3
Changing LAN settings
This step is not required, but for a number of reasons, I believe that it should not be passed. I will explain: in your own firmware from Beeline instead of the standard 192.168.0.1 set 192.168.1.1 and this, I think not enough. Perhaps for some regions of the country, this is a prerequisite for the normal operation of the connection. For example, one of the providers in my city is so. So do it. It does not harm - exactly, and perhaps get rid of possible problems with connecting.
Settings LAN connectivity on a new firmware
Choose a network - LAN and change the IP address for 192.168.1.1. Click "Save". At the top, the light will turn on, which reports that to continue the configuration of the router, you must save the settings and reboot. We press "save and restart", waiting for the end of the reboot, go to the new address 192.168.1.1 and go back to the advanced settings (the transition can occur and automatically).WAN Setup

Connections WAN Router DIR-300
Select the item Network - WAN and see a list of connections. In which, at this stage, there must be only one connection of the Dynamic IP type in the "Connected" state. If for some reason it is broken, make sure that the Beeline cable is correct to the Internet port of your router. Click "Add".

Configure L2TP connection for Beeline
On this page in the connection type item, you should select L2TP + Dynamic IP used in Beeline. You can also enter a connection name that can be any. In my case - Beeline L2TP.

VPN server address for Beeline (click to enlarge)
Scroll down this page below. The next thing we need to configure is the username and password for the connection. We enter the data obtained from the provider. We also enter the address of the VPN server - tp.internet.beeline.ru. Click "Save", after which it is once again kept at the top, near the light bulb.

All connections are connected and operate.
Now, if you return to the Advanced Settings page and select Status - Network Statistics, you will see a list of active connections and you just created the connection with Beeline among them. Congratulations: access to the Internet is already there. Let us turn to the settings of the Wi-Fi access point settings.
Wi-Fi Setup

Settings Wi-Fi DIR-300 with firmware 1.4.1 and 1.4.3 (click to enlarge)
We go to Wi-Fi - the main settings and enter the name of the access point for the wireless connection, or otherwise SSID. Any at your discretion, from Latin characters and numbers. Click changing.

WiFi security settings
Now you should also change the Wi-Fi security settings so that third parties cannot benefit your internet connection. To do this, go to the security settings Wi-Fi access point, select the authentication type (I recommend WPA2-PSK) and enter the desired password (at least 8 characters). Save settings. Ready, now you can connect to the Internet from your laptop, tablet, smartphone and other Wi-Fi devices. To do this, select your access point in the list of available wireless networks and connect using the specified password.
Setup IPTV and SMART TV Connection
The IPTV setting from Beeline does not represent completely nothing complicated. You should select the appropriate item in the extended settings menu, then select the LAN port on the router, where the prefix is connected and save the settings.
As for Smart TV, depending on the TV model, you can connect to the services both using Wi-Fi access and connecting the TV cable with any of the router ports (in addition, which is configured for IPTV, if any. Similarly, connecting and For gaming consoles - Xbox 360, Sony PlayStation 3.
Uff, it seems everything! Use