
In this step-by-step instructions, it will be shown how to completely disable ONEDRIVE in Windows 10 so that it does not start, and then remove its icon from the conductor. Actions will be slightly different for professional and home versions of the system, as well as for 32-bit and 64-bit systems (reversible actions shown). At the same time I will show how to completely delete the ONEDRIVE program itself from the computer (undesirable).
Disable ONEDRIVE in Windows 10 Home (home)
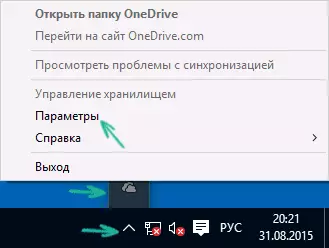
In the home version of Windows 10 to disable ONEDRIVE, you will need to perform a few simple steps. To begin with, right-click on the icon of this program in the notification area and select "Parameters".
In the ONEDRIVE parameters, remove the mark from the "Automatically run ONEDRIVE when entering Windows". You can also click the "Delete Communication with ONEDRIVE" button to stop synchronizing your folders and files with cloud storage (this button may not be active if you have not yet synchronized). Apply settings.
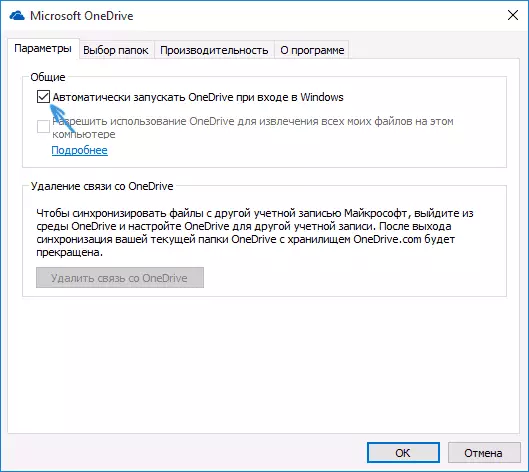
Ready, now ONEDRIVE will not automatically start. If you need to completely remove ONEDRIVE from the computer, see the corresponding section further.
For Windows 10 Pro
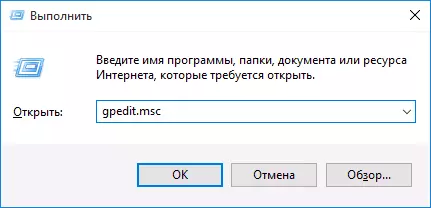
In Windows 10, professional can be used by another, in something even a simpler way to disable the use of oneDrive in the system. To do this, use the Local Group Policy Editor, run which can be started by pressing the Windows + R keys on the keyboard and entering the gpedit.msc to the "Run" window.
In the Local Group Policy Editor, go to the Computer Configuration section - administrative templates - Windows components - Onedrive.
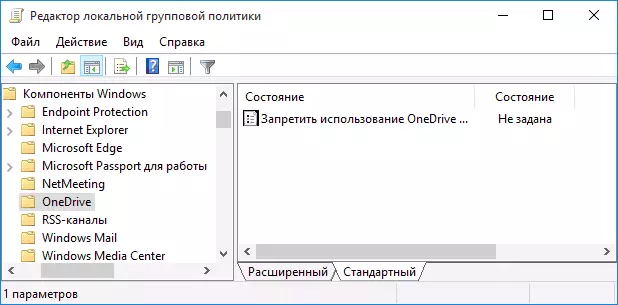
On the left side, double-click on "Prohibit Using ONEDRIVE to store files", set it to "enabled" to it, then apply the settings made.
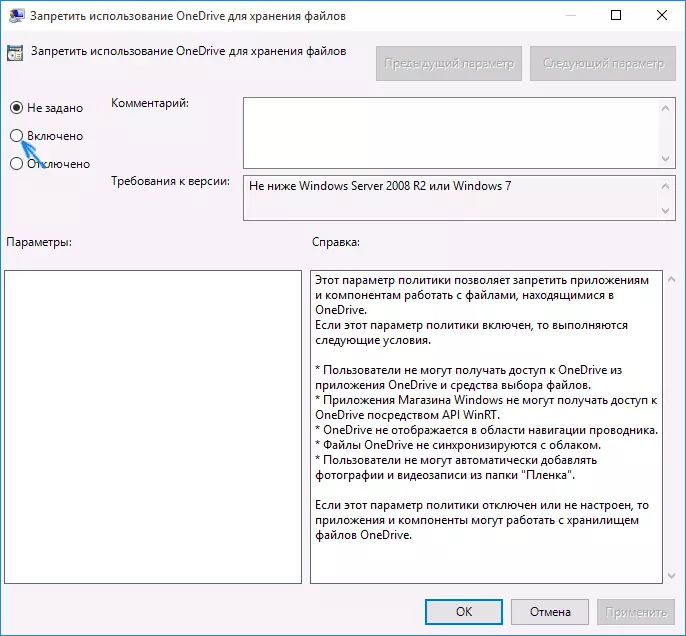
In Windows 10 1703, repeat the same for the "Pre-Use Onedrive to Store Windows 8.1" parameter, which is located there in the Local Group Policy Editor.
It will completely disconnect ondrive on your computer, it will not be launched in the future, as well as displayed in Windows 10 explorer.
How to delete ONEDRIVE from a computer
Update 2017: Starting with Windows 10 version 1703 (Creators Update), it is no longer necessary to remove all manipulations that were needed in previous versions. You can now delete ONEDRIVE in two simple ways:
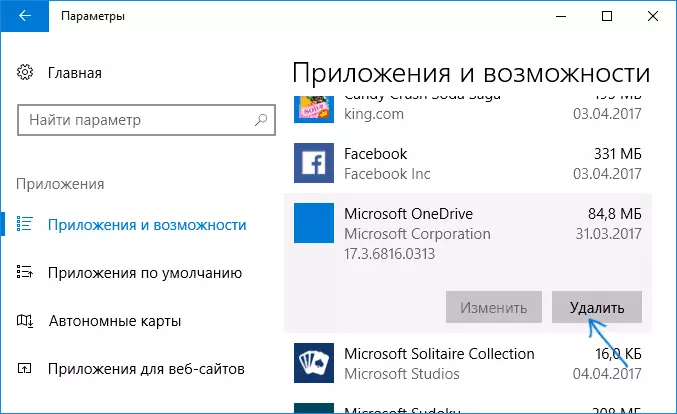
- Enter the parameters (Win + I keys) - applications - applications and capabilities. Select Microsoft Onedrive and click "Delete".
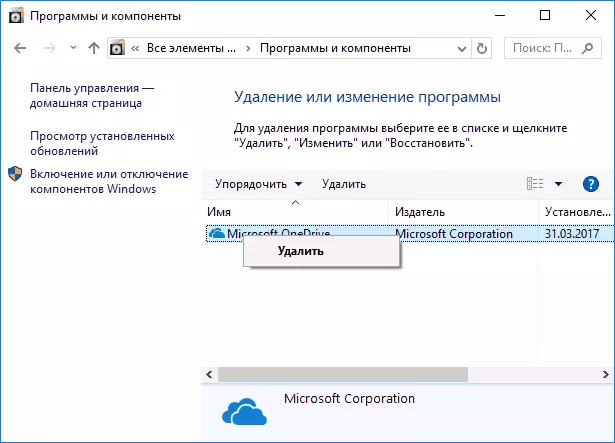
- Go to the control panel - programs and components, select ONEDRIVE and press the "Delete" button (see also: How to delete Windows 10 programs).
In a strange way, when removing ONEDRIVE in the specified methods, the ONEDRIVE item remains in the quick start panel. How to remove it - in detail in the instructions how to delete ONEDRIVE from Windows 10 Explorer.
Well, finally, the last way that allows you to completely delete ONEDRIVE from Windows 10, and not just turn it off, as shown in previous methods. The reason why I do not recommend this method to use is not quite clear how to install it after that and make it work in the same time.
The method itself is as follows. In the command prompt running on the name of the administrator, perform: taskkill / f / i ondrive.exe
After this command, delete ONEDRIVE also via the command line:
- C: \ Windows \ System32 \ ONEDRIVESTUP.EXE / UNINSTALL (for 32-bit systems)
- C: \ Windows \ syswow64 \ OneDrivesetUp.exe / Uninstall (for 64-bit systems)
That's all. I hope you all worked as needed. I note that in theory it is possible that with any updates of Windows 10, ONEDRIVE will be turned on again (as it sometimes happens in this system).
