

This instruction describes in detail the process of creating recovery points, the settings necessary for Windows 10 make it automatically, as well as ways to use previously made recovery points to roll back changes in drivers, registry and system parameters. At the same time I will tell you how to delete the created recovery points. It can also be useful: how to restore individual files from recovery points, what to do if the system recovery is disabled with the administrator in Windows 10, 8 and Windows 7, how to fix the error 0x80070091 when using the recovery points in Windows 10.
Note: Recovery points contain only information about the changed system files, critical for Windows 10 and records in the registry, but do not represent a complete image of the system. If you are interested in creating such an image, there is a separate instruction on this topic - how to make a backup of Windows 10 and recover from it.
- Setting the system recovery (for the possibility of creating recovery points)
- How to create a Windows 10 recovery point
- How to roll back Windows 10 from the recovery point
- How to remove recovery points
- Video instruction
Additional information on the possibilities of returning the operability of the OS can be found in the Windows 10 Restore article.
System Recovery Settings
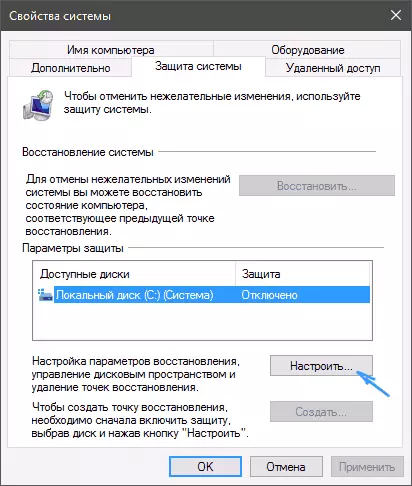
Before you start, look at the Windows 10 recovery settings. To do this, right-click on "Start", select the Control Panel Context Menu (View: Icons), then Restore.
Click on the "Setup Recovery System" item. Another way to get to the desired window is to press the Win + R keys on the keyboard and enter the SystemPropertiesProtection then press ENTER.
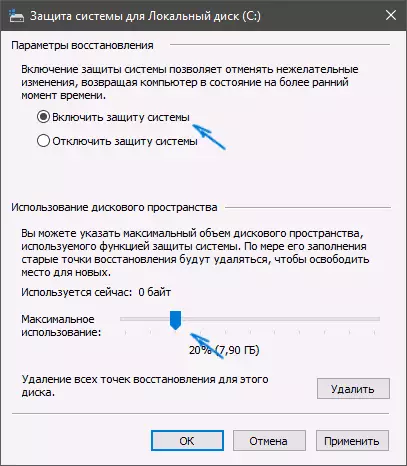
The settings window (System Protection Tab) opens. Recovery points are created for all disks for which the system protection is enabled. For example, if the protection disk is disabled for a system disk, you can turn it on by selecting this disk and pressing the "Set up" button.
After that, select "Enable System Protection" and specify the number of space that you would like to highlight to create recovery points: the more space, the greater the number of points can be stored, and as the space is filling out the old recovery points will be removed automatically.
How to create a Windows 10 recovery point
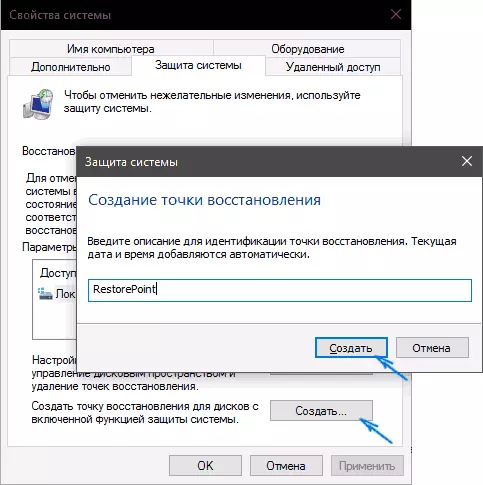
In order to create a system recovery point, on the same "System Protection" tab, (to get into which you can also via the right click on "Start" - "System" - "System Protection") Press the "Create" button and set the name of the new Points, then click "Create" again. After some time, the operation will be executed.
The computer now contains information that will allow you to cancel the latest changes in the critical Windows 10 system files, if after installing programs, drivers or other operations OS began to work incorrectly.
The created recovery points are stored in a hidden system folder SYSTEM VOLUME INFORMATION in the root of the corresponding disks or partitions, but there is no access to this folder by default.
How to roll back Windows 10 to the recovery point
And now about the use of recovery points. You can do this in several ways - in the Windows 10 interface, using diagnostic tools in special download variants, in the recovery environment running from the flash drive (if the computer is not loaded) and on the command prompt.
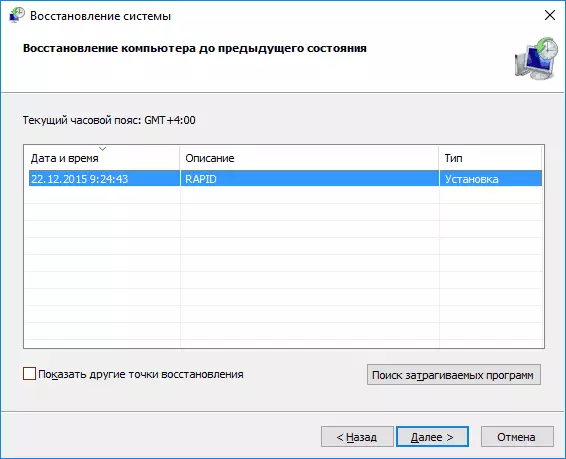
The easiest way, provided that the system starts - go to the control panel, select the "Restore" item, then click "Starting System Recovery".
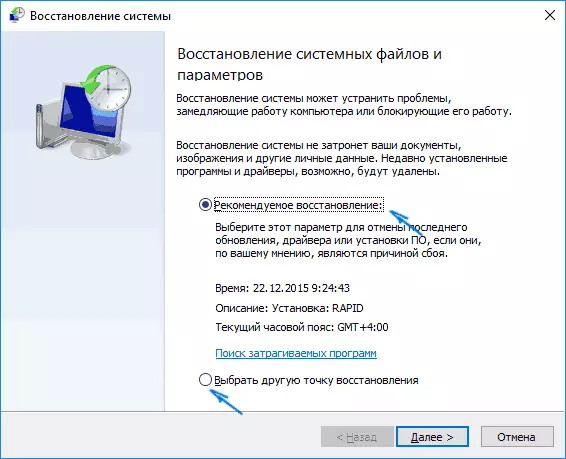
The recovery wizard will start, in the first window of which you may be offered to select the recommended recovery point (created automatically), and in the second (if you mark "Select another recovery point" you can select one of the manually created or automatically recovery points. Click "Finish" And wait for the end of the system recovery process. After the computer is automatically restarted, you will be reported that the recovery has passed successfully.
The second method is to use the recovery point - using special download options, get into which you can use the parameters - update and restore - recovery, or even faster, directly from the lock screen: Press the button "Power" to the right below, and then, holding SHIFT, Click "Reboot".
On the Special Options screen, select "Troubleshooting" - "Restore System" (or "Diagnostics" - "Advanced Parameters" - "System Restore" in earlier versions of Windows 10), then you can use the existing recovery points (in The process will need to enter an account password).

If Windows 10 does not load, you can still use the recovery points: for this you will need a boot flash drive from Windows 10 (which you have to do on another computer), or a recovery disk. When using the boot flash drive, it will be enough to select the "System Restore" item on the second screen of the installer.

As a result, you will fall on the recovery environment, as in the previous way and you can use the recovery points even on the non-launched computer.
And one more way - running rollback to the recovery point from the command line. It can be useful for you if the only working version of Windows 10 is a secure command line support mode.
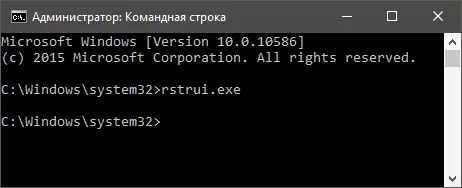
Just enter the rstrui.exe on the command line and press ENTER to start the recovery wizard (it will start in the graphical interface).
How to remove recovery points
If you needed to remove the available recovery points, go back to the "System Protection" settings window, select the disk, click "Configure", and then use the Delete button for this. This will remove all recovery points for this disk.
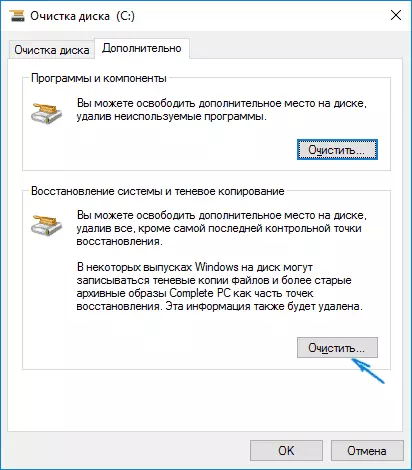
The same can be done using the Windows 10 disc cleaning utility, press Win + R to start it and enter the CleanMGR, and after the utility opens, click "Clear System Files", select the disk for cleaning, and then go to the "Advanced tab " There you can remove all the recovery points except the latest.
And finally, there is a way to remove specific recovery points on the computer, this can be done using a free CCleaner program. In the program, go to "Tools" - "System Restore" and select those recovery points you want to delete.
Video - Creating, Use and Deleting Windows 10 Recovery Points
And, in conclusion, the video instruction, if after viewing you will have questions, I will be glad to answer them in the comments.
If you are interested in a more advanced backup, it is possible to look close to third-party means for this, for example, Veeam Agent for Microsoft Windows Free.