

This review details on the use of the basic OBS Studio functions to record video from the desktop, from games and programs, program settings, as well as some additional information that may be useful. If for some reason, this program does not suit you, pay attention to the best programs for recording video from the screen.
- Installation, first launch, settings
- Record video from Screen in Obs Studio
Installation, first launch and settings OBS Studio
Download OBS Studio X64 and 32-bit (in Russian) for Windows 10, 8.1 and Windows 7, as well as for other supported OS, you can from the official page https://obsproject.com/ru/download. Installation without special nuances (available and portable OBS Studio option in the zip archive), but: in the absence of the necessary system libraries on the computer, you will be offered to install them by providing a link to download. After installing the libraries, the OBS Studio installer will need to be launched again.
After the first launch of OBS Studio, you will be prompted to run the automatic program setup wizard depending on your tasks: to record video or for broadcasting.
During the automatic configuration, a preferred recording resolution, FPS, codec (hardware or software encoding) will be determined. Usually, the parameters are determined optimally, but not always, for example:
- The program after automatic setting often establishes a smaller output resolution, despite quite productive equipment. I recommend to change in "Settings" - "video" so that the output resolution is equal to the actual resolution of the material being removed.

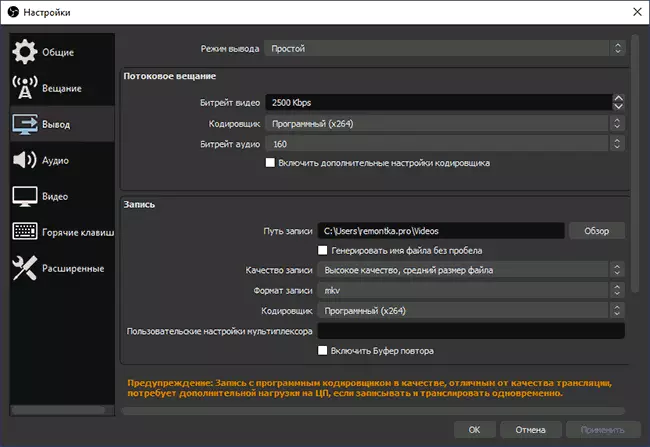
- If you have problems with a video recording (hang, something else), I recommend experimenting with the settings in the "output" section. For example, I remove the video in 4K 60 FPS on not the most powerful, but not the most slow computer and when choosing a hardware encoder with a record, problems arise, and with a software computer more than copes (this is automatically recommended to choose the hardware). Here you can choose the file format, recording quality or broadcasting, the location of the video.
- I recommend remembering the "Settings" item - "Hot Keys". This item can be useful when you already figure out the video recording from the screen: For example, right during recording using the keys you can switch the scenes (with transitions between them), hide individual items from the recorded or broadcast content.

- If you plan to record sound from various sources, look at the "Audio" section, perhaps the settings will be useful. Important: If you have Windows 10 and the sound from the microphone is not recorded, go to the start - Parameters - Privacy - Microphone and in the Allow Classic Access Access to Microphone section. Enable access for OBS Studio.
Video recording process from the screen in Obs Studio
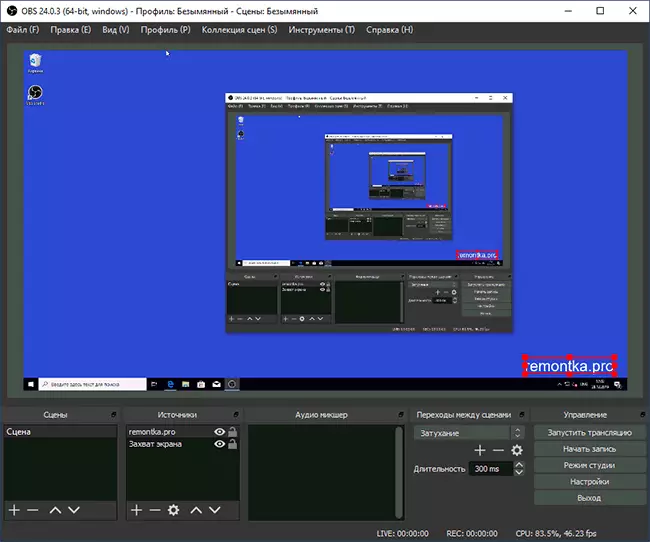
OBS Studio writes scenes (one by default, but you can create more and switch between them in the process), each of which contains selected sources, and there may be several. For example:
- In the Sources section, click "Plus" and add "screen capture", give a name source, apply the settings - our screen displays the window (let you do not confuse the effect of an infinite mirror when we start recording and folded OBS Studio, the program will stop writing It will not be such an effect). Sometimes there is a black-screen problem in the preview window and on recording, correction: how to fix a black screen when writing in OBS Studio.

- If you wish, we can add new sources: for example, text for a logo, clip art, video from a webcam, record a specific program window, video from a separate file. The source that is above in the "Sources" list will be "above" the previous source, that is, overlap it. Each source we can choose the mouse right in the preview window and move it or resize.
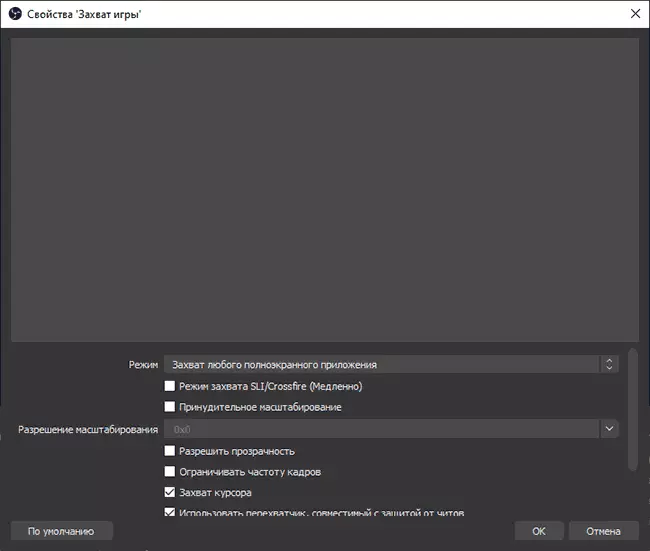
- Various settings are available for various sources. For example, for the "capture of the game" there are more of them, and for a simple "screen capture" (for writing the desktop) - less, you can only enable or disable the mouse pointer record.
- As the sources are added, separate sound tracks will appear in the "Audio Mixer" section for which it is possible to change the volume, complete the source shutdown, as well as some audio effects (you can open in the context menu of the sound source).

- If you use more than one scene when recording, you can enable "Studio Mode" to see what happens in both the scene recorded (translated) at the present moment on which you can switch.
In other functions, I hope, as the program and the occurrence of such a need to use, any user will be able to figure out. I recommend it and personally recently I use only OBS Studio. Finally, another nuance has been remembered for this program: it successfully writes the video from the screen in cases where other programs write only a black window (for example, when transmitting an image from Android to a computer, video playback).