See also:
- Setting up DIR-300 video
- Problems with D-Link DIR-300
If you have any of the routers D-Link, Asus, Zyxel or TP-Link, and Beeline, Rostelecom provider, House.ru or TTK and you never set up Wi-Fi routers, use this interactive Instructions for setting up Wi-Fi router
Diverse router DIR-300

DIR-300 B6 and B7
Wireless routers (or Wi-Fi routers, that the same thing) D-Link DIR-300 and DIR-300NRU have already been produced for a long time and the device purchased two years ago is not the same router that is sold now in the store. At the same time, there may not be external differences. The routers of hardware revisions are distinguished, which can be found on the back sticker, in the H / W VER string. B1 (example for hardware revision B1). There are the following options:
- DIR-300NRU B1, B2, B3 - no longer sold, already a million instruction written about their configuration and, if such a router caught you, you will find a way to customize it on the Internet.
- DIR-300NRU B5, B6 - the next modification is relevant at the moment, this manual is suitable for configuration.
- DIR-300NRU B7 is the only option of this router, which has significant external differences from other revisions. This instruction is suitable for configuration.
- DIR-300 A / C1 - the latest version of the D-Link DIR-300 wireless router at the moment is most often found in stores today. Unfortunately, it is subject to a variety of "glitches", the settings described herein are suitable for this audit. Note: For firmware of this version of the router, use the instruction firmware D-Link DIR-300 C1
Before setting up a router
Before connecting the router and start it, I recommend to do several operations. It is worth noting that they are applicable only if you will produce configuration from a computer or laptop to which you can connect a router with a network cable. Router can be configured even if you have no computer - using a tablet or smartphone, but in this case the operations described in this section are not applicable.Loading a new firmware D-Link DIR-300
The first thing to be done is to upload the latest firmware version for your router model. Yes, in the process, we will deal with the installation of a new firmware on D-Link DIR-300 - do not be scared, it is not a difficult task. How to upload the firmware:
- Go to the official D-Link download site at: ftp.dlink.ru, you will see the folder structure.
- Depending on your router model, go to the folder: Pub - Router - DIR-300NRU (DIR-300A_C1 for A / C1) - Firmware. This folder will contain one single file with the .bin extension. It is the last firmware file for the existing audit of the DIR-300 / DIR-300NRU.
- Load this file to your computer and remember exactly you downloaded it.

Last firmware for DIR-300 NRU B7
Check the LAN parameters on the computer
The second step that should be performed is to look into the local network connection settings on your computer. In order to do this:
- In Windows 7 and Windows 8, go to the control panel - the network management center and shared access - change the adapter parameters (in the right menu) - right-click on the "Local Network" icon and click "Properties", go to the third item.
- In Windows XP, go to the Control Panel - Network Connections, right-click on the "Local Network" icon, click "Properties" in the context menu, go to the next item.
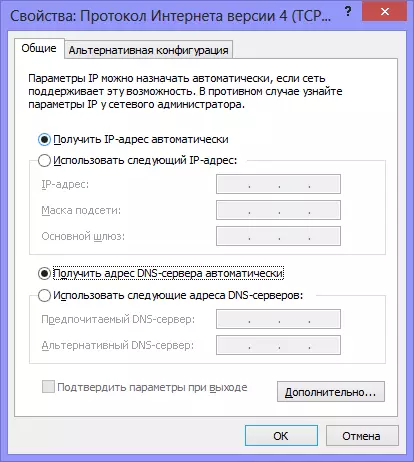
- In the window that appears in the list of components used by connection, select "Internet Protocol version 4 TCP / IPv4" and click the "Properties" button.
- Make sure the connection parameters are set to "Get the IP address automatically" and "receive DNS servers automatically" addresses. " If it is not, then set the desired parameters. It should be noted that if your provider (for example, Interzet) uses a "Static IP" type, and all fields in this window are filled with values (IP address, subnet mask, master gateway and DNS), then write down these values somewhere, They will be suitable in the future.

LAN settings for configuration DIR-300
How to connect a router to configure
Although the question of connecting the D-Link DIR-300 router to a computer, it would seem elementary, I think that it is worth it to separately mention this moment. The reason for how at least one - more than once witnessed how the people who came to the Rostelecom employees for installing the TV console, the connection was implemented "through F" - so that all supposedly worked (TV + Internet on one Computer) and did not require any action from the employee. As a result, when a person tried to connect to any device on Wi-Fi, it turned out to be unrealized.

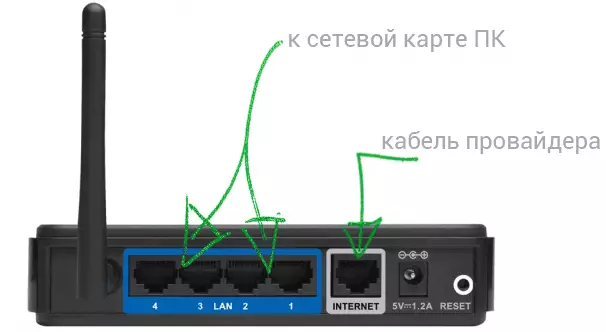
How to connect D-Link DIR-300
The picture shows how to connect the router to the computer correctly. In the Internet port (WAN), you must connect the provider cable, one of the LAN ports (better than LAN1) - to plug the wire that the other end of the computer will be connected to the corresponding port of the computer from which the DIR-300 setting will occur.
Turn on the router into the outlet. And: Do not connect your Internet connection on the computer itself during the entire firmware and router settings, as well as after that. Those. If you have some kind of beeline icon, Rostelecom, TTK, the program is an online online or something else that you use to enter the Internet, forget about them. Otherwise, then you will be wondering and ask the question: "Everything has been configured, the Internet on the computer is, and on the laptop shows without access to the Internet, what to do?".
D-Link DIR-300 firmware
The router is connected and enabled in the outlet. Run any, your favorite browser and enter to the address bar: 192.168.0.1 and press ENTER. A login and password request window will appear. Standard login and password for the DIR-300 - Admin and Admin router, respectively. If they are not suitable for some reason, reset the router to the factory settings by pressing and holding the RESET button on the back side of it, then again go to 192.168.0.1.
After the login and password are correctly input, you will be asked to set a new password. You can do it. Then you will find yourself on the main page of the router settings, which may have the following form:

Different firmware router D-Link DIR-300
In order to flash the DIR-300 Router with a new firmware in the first case, perform the following operations:
- Click "Configure Manual"
- Select the "System" tab, in it - "Update by"
- Click "Overview" and specify the path to the file that we downloaded at the preparation stage for configuring the router.
- Click "Update".
Wait for the firmware process. It should be noted that it may experience that "everything hung", also a browser can issue an error message. Do not be afraid - be sure to wait 5 minutes, turn off the router from the outlet, turn it on again, wait a minute until it boots, go back to 192.168.0.1 - most likely the firmware has been updated successfully and you can go to the next setup step.
The firmware of the D-Link DIR-300 router in the second case is as follows:
- At the bottom of the settings page, select "Advanced Settings"
- On the "System" tab, click the "Right" arrow and select "Update software".
- On the new page, click "Overview" and specify the path to the new firmware file, then click "Update" and wait for the process to complete.
Just in case I remind: if during the firmware process, the progress band "runs infinitely", it seems that everything hung or the browser shows the error, do not turn off the router from the outlet and do not take any other actions for 5 minutes. After that, simply go to 192.168.0.1 again - you will see that the firmware has been updated and everything is in order, you can go to the next step.
D-Link DIR-300 - Connecting Internet Connection
The idea of setting the router itself is that the router independently installs connecting to the Internet, after which it distributed it to all connected devices. Thus, the connection setting is the main step when setting up the DIR-300 and any other router.
In order to configure the connection, you should know which type of connection is using your provider. This information can always be taken on its official website. Here is the information for the most popular providers in Russia:
- Beeline, Corbin - L2TP, address of the VPN server TP.internet.beeline.ru - see also: Setting up DIR-300 Beeline, video for setting up DIR-300 for Beeline
- Rostelecom - PPPoe - see also Setting up DIR-300 Rostelecom
- Stork - PPTP, address of the server server.avtograd.ru, the setting has a number of features, see Setting up DIR-300 stork
- TTK - PPPoE - See Setting up DIR-300 TTK
- DOM.RU - PPPOE - Setup DIR-300 Dom.ru
- Interzet - Static IP (static IP address), more details - Setup DIR-300 Interzet
- Online - Dynamic IP (Dynamic IP Address)
If you have any other provider, the essence of the D-Link DIR-300 router settings will not change. That's what you need to do (general, for any provider):
- On the Wi-Fi Router Settings page, click "Extended Settings"
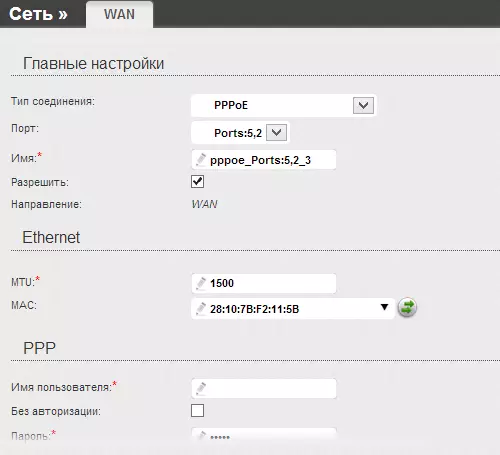
- On the Network tab, click WAN
- Click "Add" (Do not pay attention to the fact that one connection, dynamic IP is already present)
- On the next page, specify the type of connection of your provider and fill out the rest of the fields. For PPPoe - login and password for Internet access, for L2TP and PPTP - login, password and VPN address, for the type of static IP connection, the IP address, the main gateway and the address of the DNS server. In the overwhelming majority of cases, the remaining fields do not need to touch. Click the Save button.
- The page with a list of connections will open again, where you have just created the connection. Also above will be the indicator that reports that the changes must be saved. Do it.
- You will see that your connection is broken. Update the page. Most likely, if all the connection parameters were specified correctly, after the update it will be "connected", and the Internet will be available from this computer.

Configuring the DIR-300 connection
The next step is to configure the wireless network settings on D-Link DIR-300.
How to set up a wireless network and put a wi-fi password
In order to distinguish your wireless network from others in the house, as well as protect it from unauthorized access, some settings should be made:
- On the D-Link DIR-300 Settings page, click "Advanced Settings" and on the Wi-Fi tab, select "Basic Settings"
- On the basic wireless network settings page, you can specify the name of your SSID network, setting something that is different from the standard DIR-300. It will help you distinguish your network from neighbor. The remaining settings are not needed in most cases. Save the settings and return to the previous page.
- Select Wi-Fi security settings. On this page you can put a wi-fi password so that no one outsider can use the Internet at your expense or access your network computers. In the Network Authentication field, it is recommended to specify "WPA2-PSK", in the "Password" field, specify the desired password for a wireless network, consisting at least 8 characters. Save the settings.

Installation of the password on Wi-Fi on D-Link DIR-300
This configuration of the wireless network is completed. Now, to connect to Wi-Fi from a laptop, a tablet or smartphone, you just find the network with the previously specified name from this device, enter the specified password and connect. After that use the Internet, classmates, contact and anywhere without wires.
