

Using Ultraiso, you can create a bootable flash drive from an image with almost any operating system (Windows 10, 8, Windows 7, Linux), as well as with various LiveCD. See also: The best programs for creating a boot flash drive, creating a bootable flash drive of Windows 10 (all methods).
How to make a loading bar from the image of the Disk in Ultraiso
To begin with, consider the most common option for creating boot USB media to install Windows, another operating system or computer resuscitation. In this example, we will look at each step of creating a Windows 7 boot flash drive, with which in the future it will be possible to install this OS on any computer.
As it is clear from the context, we will need a bootable ISO image of Windows 7, 8 or Windows 10 (or other OS) as an ISO file, Ultraiso program and a flash drive, on which there are no important data (as all of them will be removed). Let's proceed.
- Run the Ultraiso program, select "File" - "Open" in the program menu and specify the path to the operating system image file, then click Open.

- After opening, you will see all the files that are included in the Main Ultraiso window. In general, there is no particular sense in their loyalty, and therefore will continue.
- In the main menu of the program, select "Self-loading" - "burn a hard disk image" (in different versions of the Ultraiso translation to Russian, there may be different options, but the point will be understood).

- In the Disk Drive field, specify the path to the flash drive to which will be recorded. Also in this window you can pre-format it. The image file will already be selected and specified in the window. The recording method is best to leave the one that is set by default - USB-HDD +. Click "Write".
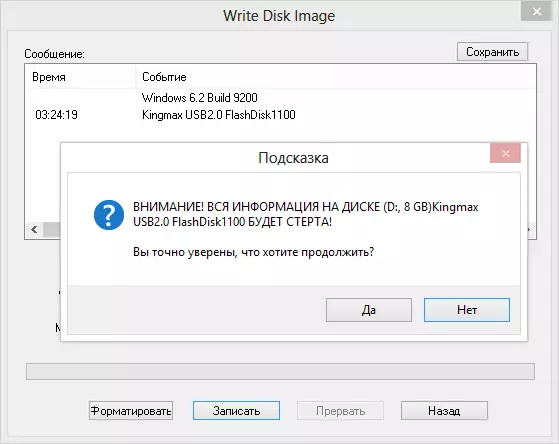
- After that, a window will appear, warning that all data on the flash drive will be erased, and then recording the loading flash drive from the ISO image, which will take several minutes.
As a result of these actions, you will receive a ready-made boot USB media from which you can install Windows 10, 8 or Windows 7 on a laptop or computer. Download free ultraiso in Russian from the official site: https://ezbsystems.com/ultraiso/download.htm
Video Instructions for Recording Blood USB in Ultraiso
In addition to the option described above, you can make the loading flash drive not from an ISO image, but from the available DVD or CD, as well as from the Windows file folder, about the more in the instructions.Creating a loading flash drive from a DVD disk
If you have a bootable CD with Windows or anything else, you can create a bootable flash drive from it directly without creating a pre-ISO image of this disk. To do this, in the program, click "File" - "Open CD / DVD" and specify the path to your disk drive, where the desired disk is.

Then, as well as in the previous case, choose the "self-loading" - "burn a hard disk image" and click "write down". As a result, we get a completely copied disk, including the bootable area.
How to make a bootable USB flash drive from a Windows file folder in Ultraiso
And the last option to create a loading flash drive, which may also be likely. Suppose you do not have a boot disk or a distribution image, and there is only a folder on the computer to which all Windows installation files are copied. What to do in this case?

In the Ultraiso program, click "File" - "New" - self-loaded CD / DVD image. A window will open, offering downloading the download file. This file in Windows 7, 8 and Windows 10 distributions is in the BOOT folder and is named Bootfix.bin.

After you have done this, at the bottom of the Ultraiso workspace, select the folder in which the Windows distribution files are located and transfer its contents (not the folder itself) to the upper right part of the program that is currently empty.
If the indicator turns on top, reporting that the "new image is full", simply click on it with the right mouse button and select the size of 4.7 GB corresponding to the DVD disk. The next step is the same as in previous cases - Self-loading - Write the image of the hard disk, specify which flash drive should be done boot and do not specify anything in the "Image File" field, there must be empty, the current project will be used. Click "write down" and after a while USB flash drive to install Windows is ready.
These are not all the ways that you can create a bootable medium in Ultraiso, but I think, for most applications of information outlined above should be enough.