
In my previous article about the distribution of Wi-Fi from a laptop, then comments appear on the point that the specified methods refuse to work in Windows 10 (however, some of them work, and the case is most likely in the drivers). Therefore, it was decided to write this instruction (updated in August 2016).
In this article - a step-by-step description of how to distribute the Internet on Wi-Fi from a laptop (or computer with a Wi-Fi adapter) in Windows 10, as well as what to do and what nuances pay attention if the described does not work: not It is possible to start the posted network, the connected device does not receive the IP address or works without internet access, etc.
I draw your attention to the fact that this kind of "virtual router" from the laptop is possible for a wired Internet connection or to connect via USB modem (although during the test it has now found that I successfully operates the Internet, "Received" also on Wi- Fi, in the previous version of the OS personally it did not go out).
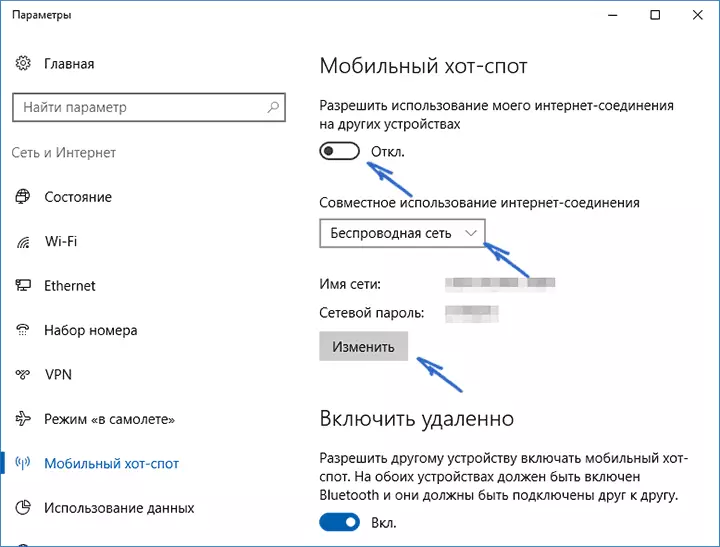
Mobile hot spot in Windows 10
In the jubilee update of Windows 10, a built-in function appeared, which allows you to distribute the Internet on Wi-Fi from a computer or laptop, it is called mobile hot spot and is in the parameters - network and Internet. Also, the function is available to turn on as a button when you click on the connection icon in the notification area.
All that you need is to include a feature, select the connection to which access to other Wi-Fi devices will be provided, set the network name and password, and then you can connect. In essence, all the methods described below are no longer required, provided that you have the latest version of Windows 10 and a supported connection type (for example, PPPoE distribution fails).
However, if you have an interest or necessity, you can get acquainted with other ways to distribute the Internet on Wi-Fi, which will be suitable not only for 10-ki, but also for previous versions of the OS.
We check the possibility of distribution
First of all, run the command line on behalf of the administrator (right click on the Start button in Windows 10, and then select the appropriate item) and enter the Netsh WLAN SHOW DRIVERS command
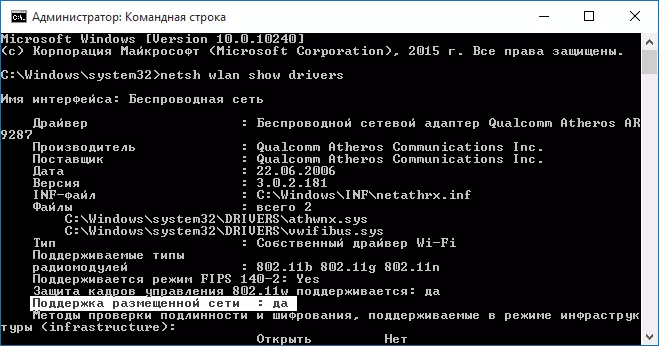
The command line window should display information about the Wi-Fi driver of the adapter and the technologies that it supports. We are interested in the "Support of the Placed Network" (in the English version - Hosted Network). If it is indicated "yes", then you can continue.
If there is no support for the posted network, then to start, update the driver to the Wi-Fi adapter, it is desirable from the official site of the laptop manufacturer or the adapter itself, after which it is possible to repeat the scan.
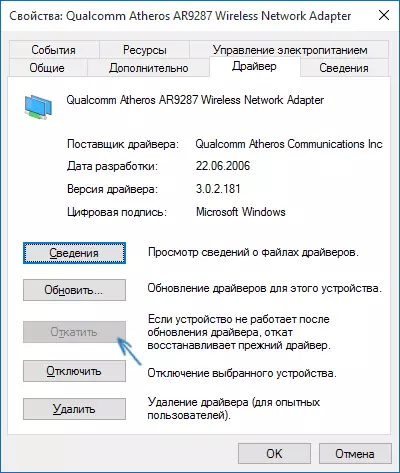
In some cases, it can help, on the contradiction, the driver rollback to the previous version. To do this, go to the Windows 10 Device Manager (you can download the "Network Adapters" button, find the desired device, click on it right-click - Properties - Driver Tab - "roll back".
Again, repeat the support check for the posted network: as if it is not supported, all other actions will not lead to any result.
Distribution Wi-Fi in Windows 10 using the command line
We continue to act on the command line running on the name of the administrator. It must be entered in it:
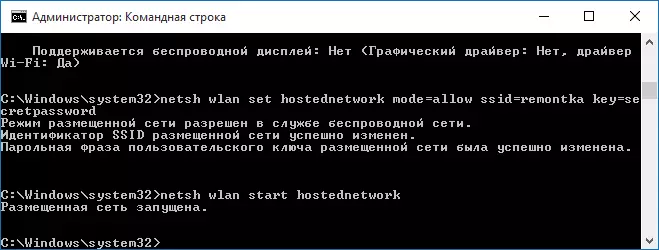
Netsh WLAN Set HostedNetwork Mode = ALLOW SSID = Remontka Key = SecretPassword
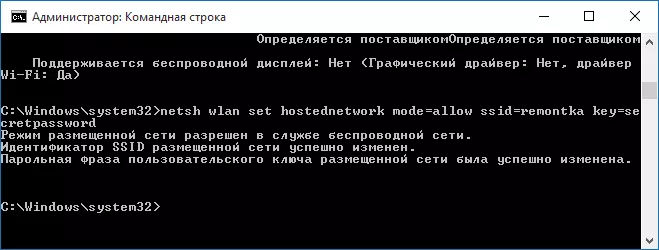
Where Remontka is the desired name of the wireless network (set your own, without spaces), and the SecretPassword is a Wi-Fi password (set your own, not less than 8 characters, do not use Cyrillic).
After that, enter the command:
Netsh Wlan Start HostedNetwork
As a result, you should see a message that the posted network is running. Already, you can connect from another Wi-Fi device, but it will not have access to the Internet.
Note: If you have seen a message that it is impossible to run the posted network, and at the same time it was written in the previous step, that it is supported (or the required device is not connected), try to disable Wi-Fi adapter in the device manager, and then re-enable it (or delete it It is there, and then update the configuration of the equipment). Also try in the device manager at the menu item View to turn on the display of hidden devices, after which in the "Network Adapters" section find Microsoft Hosted Network Virtual Adapter, click on it with right mouse button and select the "Enable" item.
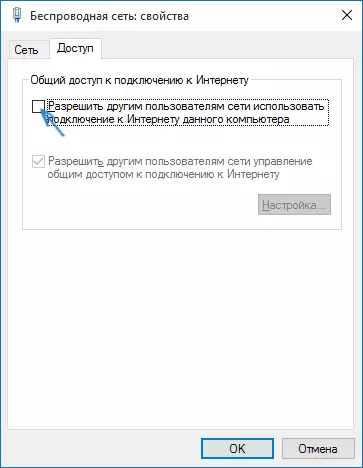
To access the Internet to appear, right-click on "Start" and select "Network Connections".
In the list of connections, click on the Internet connection (it is by the one that is used to exit the Internet) with the right mouse button - properties and open the "Access" tab. Enable "Allow other users to use Internet users to use Internet connection and apply settings (if you see in the same window of the home network connections, select the new wireless connection to the network displayed after startup).
If everything went, as it should, but there was no errors when setting up, now when connecting from the phone, tablet or other laptop to the created network, you will have access to the Internet.
For the subsequent disconnection of the Wi-Fi distribution, enter: Netsh WLAN Stop HostedNetwork on the command line on behalf of the administrator and press ENTER.
Problems and their decision
In many users, despite the execution of all the above items, Internet access through such a Wi-Fi connection does not work. Below - several possible ways to fix it and deal with the reasons.
- Try to disconnect the distribution of Wi-Fi (the command just specified), then disable the Internet connection (then to which we allowed sharing). After that, turn them on again in order: First, the distribution of Wi-Fi (through the Netsh Wlan Start HostedNetwork command, the other commands that were before, do not need), then - Internet connection.
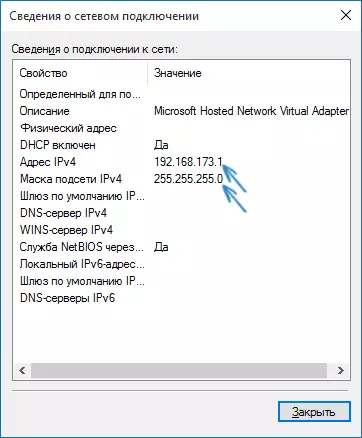
- After starting the Wi-Fi distribution, you create a new wireless connection in the list of network connections. Click on it right-click and click "Information" (status - information). See if the IPv4 address and subnet mask are specified. If not, then specify manually in the properties of the connection (you can take from the screenshot). Similarly, with problems when connecting other devices to the distributed network, you can use static IP in the same address space, for example, 192.168.173.5.
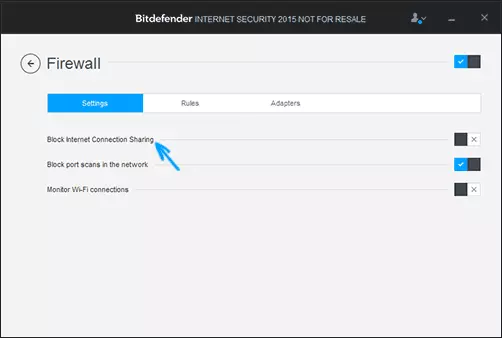
- The firewalls of many antiviruses default block sharing the Internet. To make sure that this is the cause of problems with distribution Wi-Fi, you can temporarily turn off the firewall (firewall) and if the problem has disappeared, start looking for the appropriate setting.
- Some users include sharing not to connect. It should be turned on to connect, which is used to access the Internet. For example, if you have a local network connection, and Beeline L2TP or Rostelecom PPPoE is launched for the Internet, then the total access must be provided for the last two.
- Check whether Windows is enabled "Sharing Internet Connection" (Internet Connection).
I think you will succeed. All of the above has just been verified in a bundle: a computer with Windows 10 Pro and Wi-Fi ATHEROS adapter, the devices of iOS 8.4 and Android 5.1.1 were connected.
Additionally: distribution of Wi-Fi with additional features (for example, automatic distribution start when logging into the system) in Windows 10 promises the Connectify HotSpot program, in addition, in the comments to my previous article on this topic (see how to distribute Wi-Fi from a laptop ) Some have a free MyPublicWiFi program.