

By default, Windows 10 automatically checks the availability of the update, downloads and installs them, while turning off the updates has become more complicated than in previous versions of the operating system. Nevertheless, this is possible: using OS or third-party administration tools. In the instructions below - how to completely disable the system updates, if you need to disable the installation of a specific KB update and delete it, you will find the necessary information in the manual how to delete Windows 10 updates. See also: how to disable automatic driver update in Windows 10 .
In addition to the full shutdown of Windows 10 updates, the instructions are shown how to disable a specific update that causes problems, or, if necessary, "great update", such as Windows 10 20H2, 2004 May 2020 Update, Windows 10 1909, without turning off the installation of security updates . Also consider that there are separate Windows 10 update management programs that allow you to disable them automatically search for, downloading and installing, and if necessary, download the necessary manually.
Full windows 10 updates without turning off the update center (recommended method, work is checked in autumn-winter 2020)
This method I tested throughout November 2020 on Windows 10 last version, and it showed itself fully operational. The essence is to set up updates so that the systems use the local update server. At the same time, due to the actual absence of this server, the updates will not be loaded.At the same time, the Windows update center service will continue to work (not loading the system), and no Microsoft servers will not be blocked: it can be useful for health and proper functioning of the remaining system components, setting some Microsoft development components, updates from Windows Store and other Tasks.
To disable Windows 10 updates to this method, create a REG file with the following contents:
Windows Registry Editor Version 5.00 [HKEY_LOCAL_MACHINE \ SOFTWARE \ Policies \ Microsoft \ Windows \ WindowsUpdate] "DoNotConnectToWindowsUpdateInternetLocations" = dword: 00000001 "UpdateServiceUrlAlternate" = "server.wsus" "WUServer" = "server.wsus" "WUStatusServer" = "server. WSUS "[HKEY_LOCAL_MACHINE \ SOFTWARE \ POLICIES \ Microsoft \ Windows \ WindowsUpdate \ AU]" USEWUSERVER "= DWORD: 00000001After that, "Run" the created file and agree with the addition of parameters in the registry. Immediately after that, without rebooting the computer, the updates will stop download and update.
Video with a demonstration of the method
To cancel the changes made:
- From the Registry sectionHKey_Local_machine \ Software \ Policies \ Microsoft \ Windows \ WindowsUpdateDate parameters Donotconnecttowindowsupdateinternetlocations, UpdateServiceURLALTERNATE., Wserver, WustatusServer.
- From the Registry SectionhKey_Local_machine \ Software \ Policies \ Microsoft \ Windows \ WindowsUpdate \ AUDAGE Parameter Usewuserver
The same update method is implemented in a free Winaero Tweaker utility.
How to disable Windows 10 automatic updates, but allow manual installation updates
With the release of new versions of Windows 10, many ways to disable updates have stopped working: Windows Update Center is turned on by itself, the lock in hosts does not work, tasks in the task scheduler are automatically activated over time, the registry parameters do not work for all OS editions.However, a way to disable updates (in any case, their automatic search, download to a computer and installation) exists. The tasks of Windows 10 there is a task of Schedule Scan (in the UpdateRCHESTRATOR section, which, using the C: \ Windows \ System32 \ USOCLIENT.EXE system, regularly checks the availability of updates, and we can do it so that it does not work. At the same time, updating malware definitions for Windows Defender will continue to be installed automatically.
Disable Schedule Scan task and automatic updates
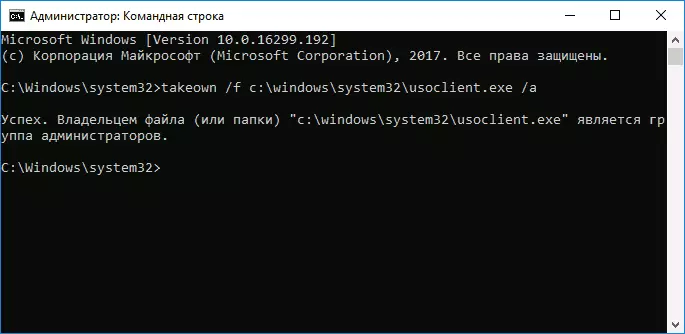
In order for the Schedule Scan job to stop working, and accordingly they stopped automatically checked and downloaded Windows 10 updates, you can establish a ban on reading and executing the USOClient.exe program, without which the task will not work.
The procedure will be as follows (to perform actions you must be an administrator in the system)
- Run the command prompt on behalf of the administrator. To do this, you can start typing the "command line" in the search for the taskbar, then right-click on the result found and select the "Startup from the administrator" item.
- In the command prompt, enter the TAKEOWN / F C: \ Windows \ System32 \ USOCLIENT.EXE / AI Press Enter.
- Close the command prompt, go to the C: \ Windows \ System32 folder and find a USOClient.exe file there, click on it right-click and select "Properties".
- On the Safety tab, click the Edit button.
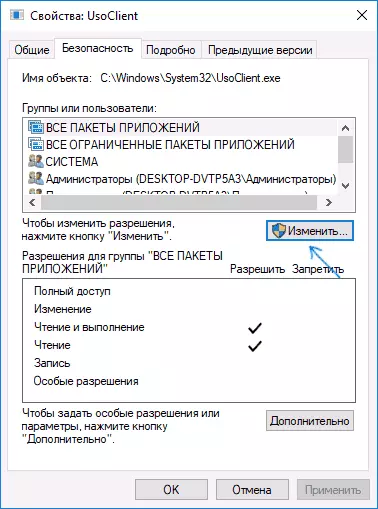
- Alternately select each item in the "Group or Users" list and remove all the marks in the "Allow" column below.
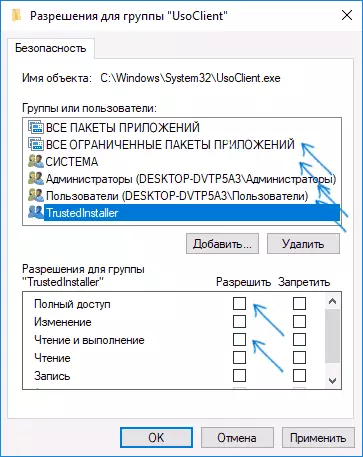
- Click OK and confirm the change in permissions.
- Restart the computer.
After that, Windows 10 updates will not be installed (and detected) automatically. However, if you wish, you can check the availability of updates and set them manually to "Parameters" - "Update and Security" - "Windows Update".
If you wish, you can return permissions to use the USOClient.exe file in the command prompt running on the name of the administrator:
ICAcls C: \ Windows \ System32 \ USOClient.exe / Reset (however, the permissions for TrustedInstaller will not be returned, as well as the owner of the file will not be changed).Notes: Sometimes, when Windows 10 tries to contact the USOClient.exe file, you can get an error message "denied access". The steps described above 3-6 can be performed on the command line using ICACLS, but I recommend the visual path, since the list of groups and users with permissions can vary in the direction of OS updates (and in the command line you need to specify them manually).
The comments offer another way that may be workable, did not personally checked:
There is another idea that automatically disables the Windows Update Center, which is the essence. Windows 10 includes Windows Update Himself, in Computer Management - Service Programs - View Events - Windows Logs - System, Displays Information about this, and it is indicated that the user itself has turned on the service (Aha, only turned off recently). Hood, there is an event, went further. Create a batch file that stops the service and changes the type of startup to "disable":
Net Stop Wuauserv SC Config Wuauserv Start = DisabledGud, Batnik created.Now create a task in computer management - Service Programs - Task Scheduler.
- Triggers. Journal: System. Source: SERVICE CONTROL MANAGER.
- Event ID: 7040. Actions. Launching our batch file.
The remaining settings at your discretion.
Also, if recently you have become forced to install an update assistant to the next version of Windows 10 and you need to stop it, pay attention to the new information in the "Disable update to Windows 10 and 1809" section below in this instruction. And one more note: if it does not manage to achieve the desired (and in 10-ke it becomes more difficult and more difficult), see comments on the instructions - there are also useful information and additional approaches.
Disable Windows 10 update center (updated so that it does not turn on automatically)
As you might notice, usually the update center turns on again, the registry key and task parameters The system also leads to the state you need, in such a way that the updates continue to download. However, there are ways to solve this problem, and this is a rare case when I recommend using a third-party. First of all, I recommend to try the program according to which I have a separate instruction - how to disable Windows 10 updates in Windows Update Blocker.UpdatedisABler - a very effective method to completely disable updates
Updatedisabler is a simple utility that allows you to easily completely disable Windows 10 updates and, perhaps, the current time is one of the most effective solutions.
When installing, Updatedisabler creates and starts the service that does not allow Windows 10 to start downloading updates again, i.e. The desired result is achieved not by changing the registry settings or disabling the Windows 10 Update Service, which is then changed again the system itself, and constantly monitors the update tasks and the state of the update center and, if necessary, turns off immediately.
The process of disconnecting updates using UpdatedSaBler:
- Download the archive from https://winaero.com/download.php?view.1932 and unpack the computer. I do not recommend that desktop or document folder as a storage place, then we need to enter the path to the program file.
- Run the command prompt on behalf of the administrator (for this you can start typing "Command Line" in the search for the taskbar, then right-click on the result in the result and select the "Startup from the administrator" item) and enter the command consisting of the path to the Updaterdisabler file .exe and parameter -install, as on the example below: C: \ Windows \ Updaterdisabler \ Updaterdisabler.exe -install

- The Windows 10 update disable service will be installed and running, download will not be downloaded (including manually through the parameters), and their search will also be performed. Do not delete the program file, leave it in the same location, from where the installation was made.

- If necessary, turn on updates again, use the same method, but specify -Remove as a parameter.
At the moment, the utility works properly, and the operating system does not include automatic updates again.
Changing Windows Startup Settings Windows Update
This method is suitable not only for Windows 10 professional and corporate, but also for the home version (if you have Pro, I recommend using the Local Group Policy Editor, which is described below). It is in turning off the service center service. However, starting from version 1709, this method stopped working in the described form (the service is included with the time itself).
Before using the method, I strongly recommend creating a system recovery point, according to some reviews in the comments, users cannot roll back the changes (the problem itself could not reproduce).
After disconnecting the specified service, the OS will not automatically download updates and set them until you turn it on again. Recently, the Windows 10 update center has become turned on, but it can be accessed and disable it forever. To turn off, do the following steps.
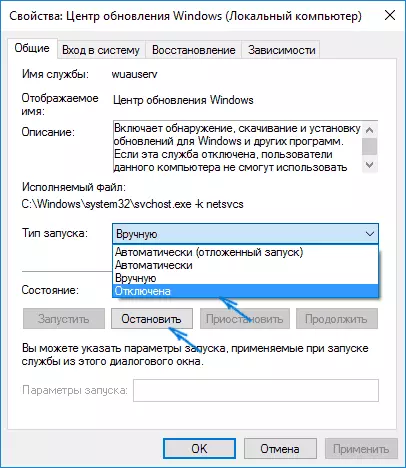
- Press the Win + R keys (Win-key with the OS emblem), enter the Services.msc in the "Run" window and press ENTER. The "Services" window opens.

- Find in the Windows Update Service list (Windows Update), double-click on it.
- Click "Stop". Also set the "Run Type" field to "disabled", apply the settings.
- If you leave it, then after a while the update center will turn on again. To do this, in the same window, after applying the parameters, go to the "Login to System" tab, select "With Account" and click "Overview".
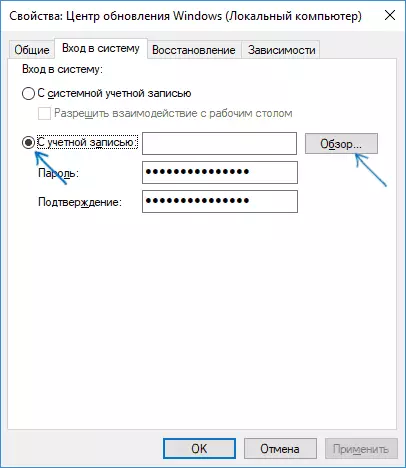
- In the next window, click "Advanced", then "Search" and in the list, select the user without administrator rights, for example, a built-in guest Guest.

- In the Remove password and the password confirmation for the user (it does not have a password) and apply the settings.

Now the automatic update of the system will not happen: if necessary, you can simultaneously start the update center service and change the user from which the "with a system account" is started.
Also, an instruction with additional ways is also available on the site (although the above must be enough): how to disable Windows 10 update center.
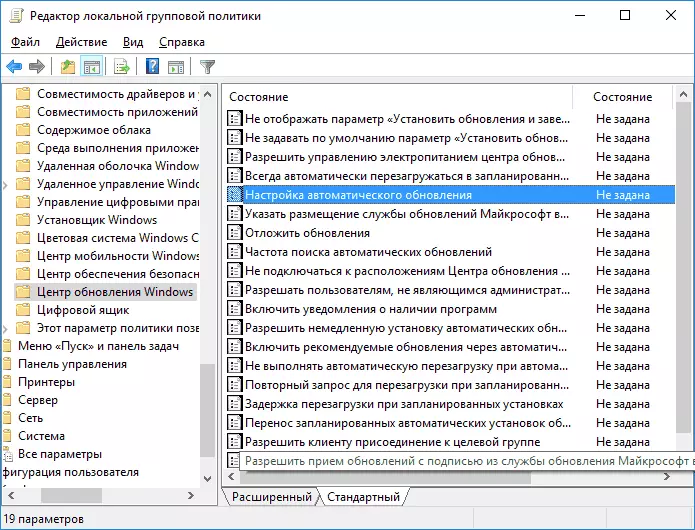
How to disable Windows 10 automatic updates in the Local Group Policy Editor
Disabling updates using the Local Group Policy Editor only works for Windows 10 Pro and Enterprise, but it is the most reliable way to perform the specified task. Steps:
- Run the local group policy editor (press Win + R, enter gpedit.msc)
- Go to "Computer Configuration" - "Administrative Templates" - "Windows components" - "Windows Update". Find the Automatic Update Setup item and click on it.
- In the Settings window, set "Disabled" so that Windows 10 never checked and has not installed the update.
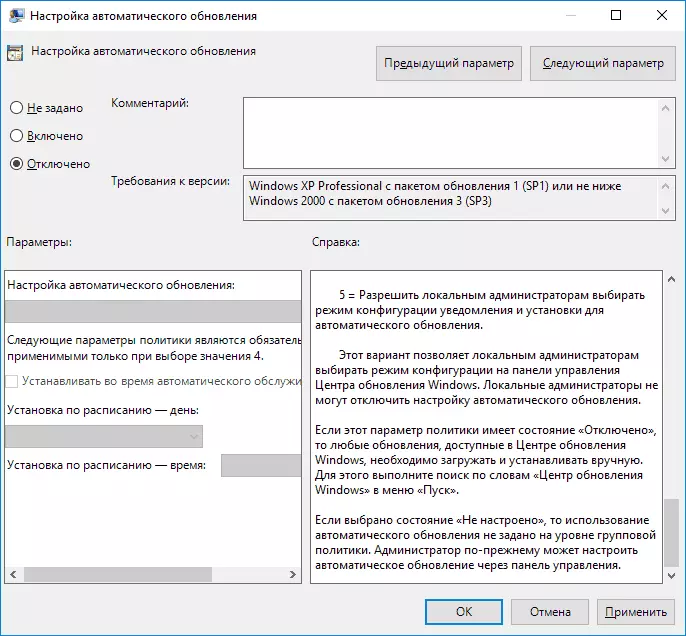
Close the editor, after which go to the system parameters and check the availability of updates (it is necessary that the changes take effect, report that sometimes it does not work immediately. At the same time, you will not be able to check the update when manual checking, but in the future you will automatically search and install will not be executed in the future ).
The same action can be done using the registry editor (there will be no work in your homework), for this, in the HKEY_LOCAL_MACHINE \ Software \ Policies \ Microsoft \ Windows \ WindowsPDATE \ AU section, create a DWORD parameter named Noautoupdate and value 1 (unit).
Using a limit connection to prevent installation updates
Note: Starting with Windows 10 "Update for Designers" in April 2017, the limit connection task will not block all updates, some will continue to download and set.By default, Windows 10 does not upload updates automatically when using a limit connection. Thus, if you for your Wi-Fi, specify "set as a limit connection" (it will not work for the local network), it disable the installation of updates. The method also works for all Windows 10 editions.
To do this, go to the parameters - Network and Internet - Wi-Fi, click on the name of the desired Wi-Fi network, and then in its parameters, turn on the "Set as a limit connection" item to the OS refer to this connection as the Internet with payment For traffic.
Disabling the installation of a specific update
In some cases, it may be necessary to disable the installation of a specific update, which leads to the improper operation of the system. To do this, you can use the official Microsoft Show OR Hide Updates utility (Show or Hide Updates):
- Load the utility from the page of the official website.
- Run the utility, click Next, and then - Hide Updates.
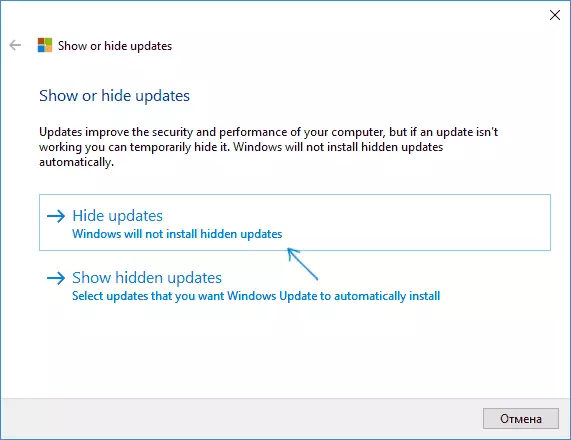
- Select updates that need to be disconnected.
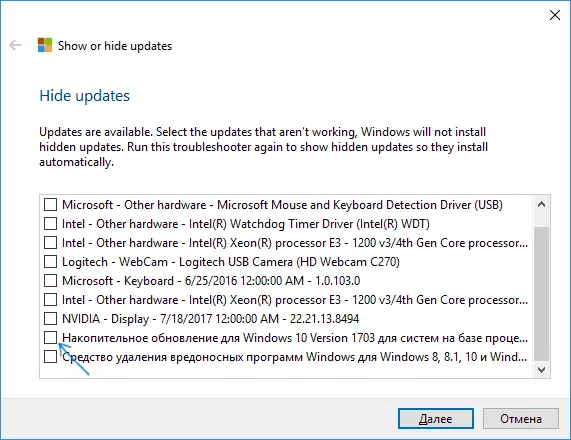
- Click Next and wait for the task completion.
After that, the selected update will not be installed. If you decide to install it, start the utility and select Show Hidden Updates, then remove the update from the hidden.
Disable update to Windows 10 new version
Recently, the update of Windows 10 components began to be installed on computers automatically regardless of the settings. There is the following way to disable it:
- In the control panel - programs and components - view the installed updates, find and delete the updates KB4023814 and KB4023057 if they are present there.
- Create the following reg file and edit the registry Windows 10.Windows Registry Editor Version 5.00 [HKEY_LOCAL_MACHINE \ SOFTWARE \ Policies \ Microsoft \ Windows \ WindowsUpdate] "DisableOSUpgrade" = dword: 00000001 [HKEY_LOCAL_MACHINE \ SOFTWARE \ Policies \ Microsoft \ WindowsStore] "DisableOSUpgrade "= dword: 00000001 [HKEY_LOCAL_MACHINE \ SOFTWARE \ Microsoft \ Windows \ CurrentVersion \ WindowsUpdate \ OSUpgrade]" AllowOSUpgrade "= dword: 00000000" ReservationsAllowed "= dword: 00000000 [HKEY_LOCAL_MACHINE \ SYSTEM \ Setup \ UpgradeNotification]" UpgradeAvailable "= dword: 00000000
Another method that is suitable for Windows 10 Pro is described in the instructions how to set the target (maximum) version of Windows 10 in the registry.
In a short time, in the spring 2020, the next large update will begin to come to the computers - Windows 10 version 2004. If you do not want to install it, this can be done as follows:
- Go to - Update and Security and click "Advanced Settings" in the Windows Update Center.
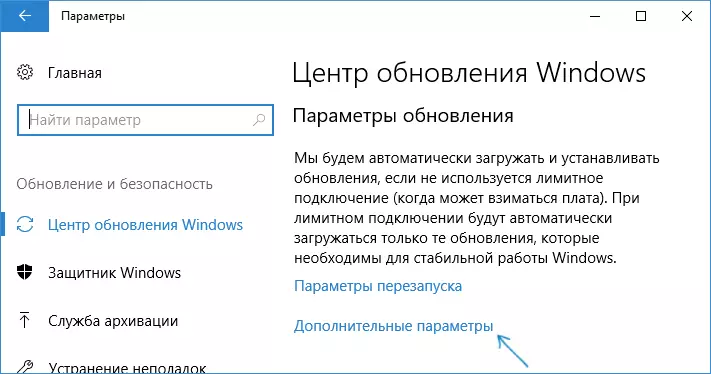
- In the Advanced Parameters in the "Select when installing updates", set "Semi Annual Channel" or "Current Branch for Business" (Available to select the items depend on the version, the option will postpone the update setting for several months compared to the release date of the next update for simple users).

- In the "Updating of Components, it includes ..." Set the maximum value - 365, it will postpone the update setting for another one year.
Despite the fact that this is not a complete shutdown of the update installation, most likely, the term per year will be quite enough.
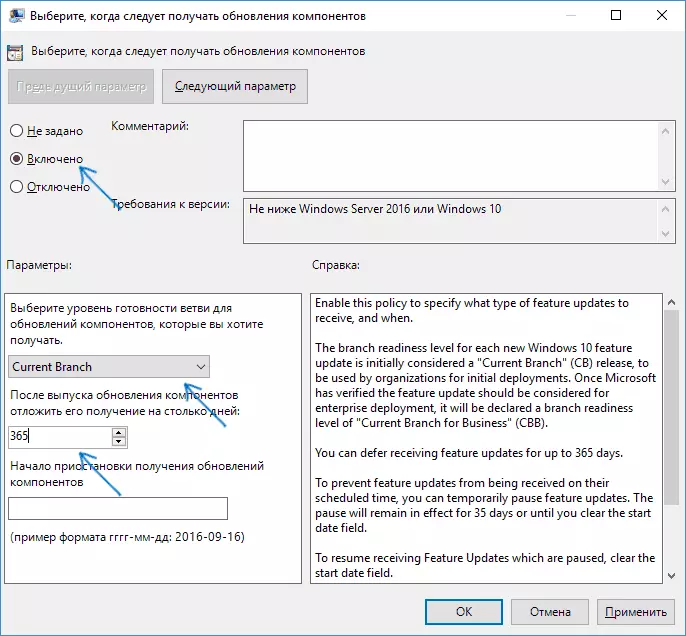
There is another way to postpone the installation of updates of Windows 10 components - using the Local Group Policy Editor (only in Pro and Enterprise): Run the gpedit.msc, go to "Computer Configuration" section - "Administrative Templates" - "Windows components" - "Center Windows updates "-" postpone Windows updates ".

Double-click the "Select the Windows 10 components updates", set "Enabled", "Semi Annual Channel" or "Current Branch for Business" and 365 days.
Programs to disable Windows 10 updates
Immediately after the release of Windows 10, many programs appeared that allow you to turn off certain functions of the system (see, for example, an article about disabling the spying of Windows 10). There are those and to disable automatic updates.
Recommended by me Solution - O & O Shutup10. All that will be needed is to include two points in the program:
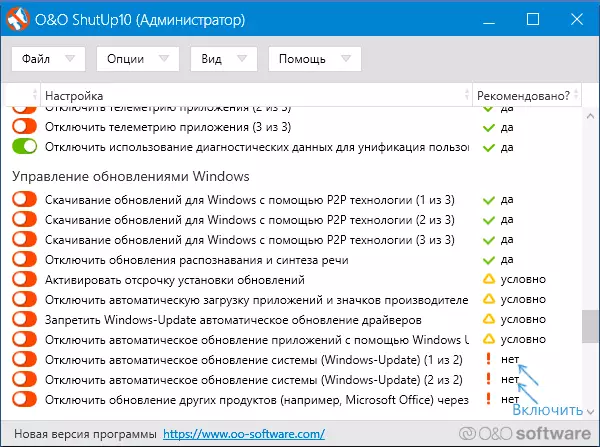
And, after applying the settings, restart the computer. You can download the utility from the official site https://www.oo-software.com/en/shutup10
Another program that currently working and does not contain anything unwanted (checked a portable version, you recommend that you also check on Virustotal) - free Win Updates Disabler, available for download on site2unblock.com.

After downloading the program, all that is required to be done is to mark the item "Disable Windows Updates" and click the "Apply Now" button (apply now). Administrator rights are required for work and, among other things, the program can disable Windows Defender and Firewall. The second in this kind - Windows Update Blocker, though this option is paid.
Suspend updates in Windows 10 parameters
In Windows 10 of the latest version, in the "Update and Security" options, the Windows Update Center - "Advanced Options" appeared a new item - "Suspension of updates".

When using the option, any updates will stop being installed for a period of 35 days. But there is one feature: after you turn it off, the download will automatically start and install all updates, and until this point, the re-suspension will not be possible.
How to disable the automatic installation of Windows 10 updates - Video instruction
Finally - video in which the methods described above prevent installation and download updates are clearly shown.
I hope you were able to find ways suitable in your situation. If not - ask in the comments. Just in case, I note that disabling the system updates, especially if this licensed OS Windows 10 is not the best practice, do it only with the need.