

In this manual, information on why such an error occurs, and, of course, to correct it in various situations: when there are no important data on the system section or disk, or in cases where such data is and needed to be saved. Similar errors when installing OS and methods for solving them (which may appear after some ways offered on the Internet ways to correct the problem described here): The partition MBR table is on the disk, the selected disk has a GPT sections style, the Windows installation error is not possible for this disc. "(In contexts other than GPT and MBR).
The reason for the error "We could not create a new one or find an existing section"
The main reason for the impossibility of installing Windows 10 with the specified message that cannot be created a new partition is the existing partition structure on the hard disk or SSD, which prevents the creation of the necessary system partitions with the bootloader and the recovery environment.
If it is clear from the described not to the end, what exactly happens, I try to explain otherwise
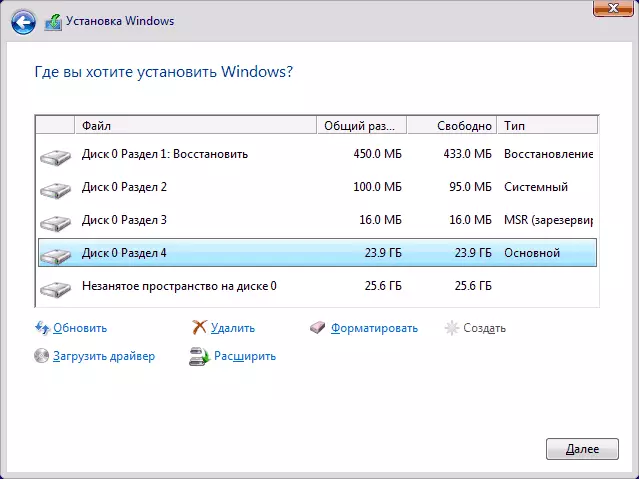
- The error occurs in two situations. First option: On the only HDD or SSD to which the system is installed, there are only partitions created by you manually, in diskpart (or using third-party programs, for example, Acronis funds), while they occupy the entire disk space (for example, one section on the entire disk, If it was previously used to store data, was the second disk on the computer or just purchased and formatted). At the same time, the problem manifests itself when loading in EFI mode and installation on the GPT disk. Second option: On a computer more than one physical disk (or flash drive is defined as a local disk), you install the system to disk 1, and the disc 0, which is in front of it, contains some of its own sections that cannot be used as a system partition (and system sections Always recorded by the installer on the disk 0).
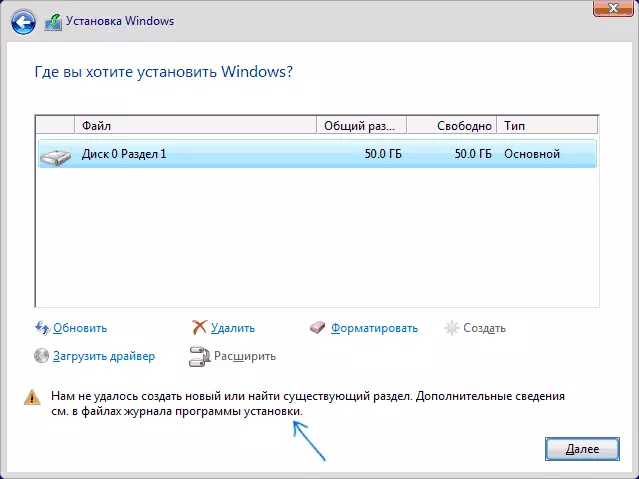
- In this situation, the Windows 10 Instant "No means" setting system sections (which can be seen in the following screenshot), and previously created system sections are also missing (since the disk was not previously systemic or, if it was reformatted without taking into account the need for system Sections) - This is exactly what is interpreted "We could not create a new one or find an existing section."
This explanation can already be enough for a more experienced user to understand the essence of the problem and correct it. And for novice users, several solutions are described below.
Attention: The following solutions suggest that you set one single OS (and not, for example, Windows 10 after installing Linux), and, in addition, the disc on which the installation is performed is indicated as a disc 0 (if it is not when you have several disks On a PC, change the order of hard drives and SSD to bios / uefi so that the target disk is in the first place, or simply switch the SATA cables).
Several important notes:- If in the installation program disk 0 is not the same disk (speech about physical HDD) to which the system is planned (i.e., you put it on the disk 1), and, for example, a disk with data, then you can search for bios / UEFI Parameters responsible for following the order of hard drives in the system (not the same as the load order) and install the disk to be installed on the first place. This can already be enough to solve the problem. In different versions of BIOS, the parameters can be located in different places, most often in a separate Hard Disk Drive Priority subsection on the Boot Configuration tab (but may also be in the SATA configuration). If you cannot find such a parameter to find, you can simply change the loops between the two disks, it will change their sequence.
- Sometimes when Windows is installed from a flash drive or an external hard disk, it is they displayed as a disc 0. In this case, try installing the load not from the flash drive, but from the first hard disk to the BIOS (provided that the OS is not installed on it). Loading will still happen from an external drive, but now under the disk 0 we will have the desired hard disk.
Error correction in the absence of important data on the disk (section)
The first of the ways to correct the problem assumes one of two options:
- On the disk to install Windows 10 there are no important data and everything is subject to removal (or already deleted).
- There is more than one partition on the disk and on the first of them there are no important data that you want to save, while the partition size is sufficient to install the system.
In these situations, the solution will be very simple (data from the first partition will be deleted):
- In the Installation Program, highlight the partition to which you try to install Windows 10 (usually disk 0 section 1).
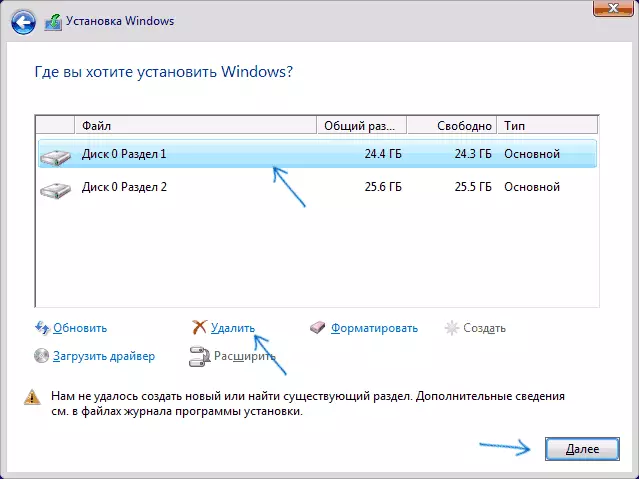
- Click "Delete". It is even better to remove all sections from the disk 0 (provided that the system is put on it and there is no important data).
- Highlight "unoccupied space on a disk 0" and click "Next". Confirm the creation of system partitions if such a request is such, the installation will continue. If it did not work, then restart the computer, start the installation again and start the installation in an unoccupied space.
As you can see, everything is quite simple and any actions on the command line using DiskPart (Deleting partitions or cleaning the disk using the Clean command) in most cases are not required. Attention: The installation program needs to create system partitions on the disk 0, and not 1, etc.
Finally - video Instructions for correcting the error when setting the method described above, and then additional methods for solving the problem.
How to fix "Failed to create a new one or find an existing section" When installing Windows 10 to a disk with important data
The second common situation - installing Windows 10 is made on the disk, which previously served to store data, the most likely, as described in the previous solution, it contains only one partition, but the data on it should not be injured.In this case, our task is to squeeze the section and release a disk space so that system sections of the operating system are created there.
You can do this with both the Windows 10 installation program and third-party free programs for working with disc partitions, and in this case the second method, if possible, use it, will be preferable (further explains why).
We release a place for system partitions using diskpart in the installation program
This method is good because to use it, we will not need something additional, in addition to the already running Windows 10 installation program. Minus the method is that after installation, we will receive a not quite ordinary partition structure on the disk when the bootloader is on the section with the system , and additional hidden system sections - at the end of the disk, and not at its beginning, as it usually happens (in this case, everything will work, but in the future, for example, when problems with the loader, some standard ways of solving problems may not work like this As expected).
In this scenario, the necessary actions will be as follows:
- While in the Windows 10 Installation Program, press SHIFT + F10 (or SHIFT + FN + F10 on some laptops).
- The command line opens, use the following commands in order.
- diskpart.
- List Volume
- SELECT VOLUME N (where n is the number of single volume on the hard disk or the last partition on it, if there are several of them, the number is taken from the results of the previous command. Important: It should be about 700 MB of free space).
- shrink desired = 700 minimum = 700 (in my screenshot - 1024, because there was no confidence how much space is really needed. 700 MB is enough, as it turned out).
- EXIT.

After that, close the command line, and in the section selection window for installation, click "Update". Select a section to install (not unoccupied space) and click "Next". At the same time, the installation of Windows 10 will continue, and the unemployed space will be used to create system partitions.
Using Minitool Partition Wizard Bootable to free up space section sections
In order to make a place for Windows 10 system partitions (not at the end, and at the beginning of the disk) and not losing important data is suitable, in fact, any boot software for working with the partition partitions. In my example, it will be a free MINITOOL PARTITION WIZARD utility, available as an ISO image on the official website https://www.partitionwizard.com/partition-wizard-bootable-cd.html (update: from the official site removed the download ISO but it is In a web archive, if you view the specified page for previous years).
This ISO You can burn to a disk or boot flash drive (bootable flash drive can be done using the RUFUS program, select the MBR or GPT for BIOS and UEFI, respectively, the file system - FAT32. For computers with EFI download, and this is most likely, your case can be Just copy all the contents of the ISO image to the flash drive with the FAT32 file system).
Then load from the created drive (secure download must be disabled, see how to disable Secure Boot) and make the following:
- On the screensaver of the program, press ENTER and wait for the download.
- Select the first partition on the disk, and then press "MOVE / Resize" to resize the section.
- In the next window, using the mouse or indication of the numbers, free the place "left" from the section, about 700 MB should be sufficient.

- Click OK, and then, in the main program window - Apply.
After applying the changes, restart the computer from the Windows Distribution - this time an error that failed to create a new one or find an existing section appear should not, and the installation will be successfully (when installing, select the section, and not unoccupied disk space).
I hope the instruction could help, and if something suddenly did not work out or remain questions - ask in the comments, I will try to answer.