

Hauv cov lus qhia luv luv rau cov pib tshiab hauv kev nthuav qhia yuav ua li cas lov tes taw pw hom thiab hibernation thaum koj kaw lub laptop hau thiab tom qab qhov kev txiav txim siab no nws txuas ntxiv ua haujlwm.
Kev hloov pauv mus rau hom pw tsaug zog lossis hibernation tom qab kaw lub laptop hau
Cov ntsuas uas yuav tsum tau ua haujlwm tom qab kaw lub hau, nyob hauv lub Windows Icon uas tuaj yeem qhib rau ntawm lub Windowsce icon hauv Windows 10 Tswj Vaj Huam Sib Luag lossis siv cov kauj ruam hauv qab no:
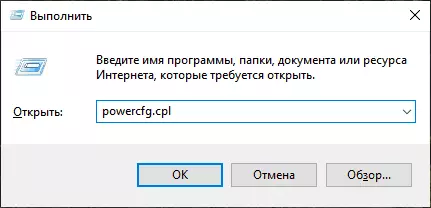
- Nias WINS + R - R - R-REW ntawm cov keyboard, nkag hluav taws xob.cpl thiab nias Enter.
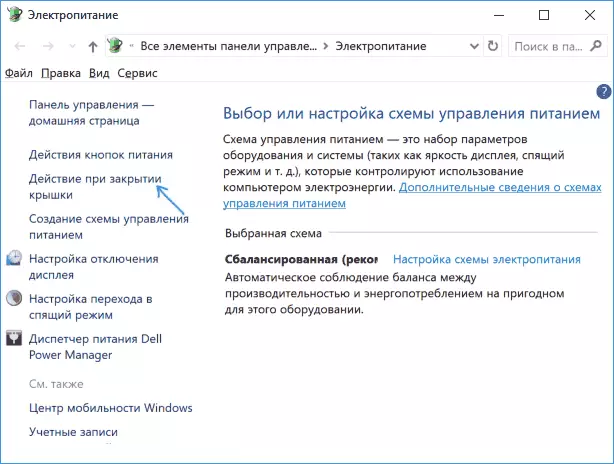
- Nyob rau hauv lub chaw teeb hluav taws xob uas qhib, ntawm sab laug, nyem rau ntawm "kev ua thaum kaw lub hau".
- Nyob rau hauv lub qhov rai tom ntej nyob rau hauv "thaum kaw ib daim npog", qhia meej ", qhov no tuaj yeem muab cais rau cov ntaub ntawv ntawm lub roj teeb los ntawm lub network.
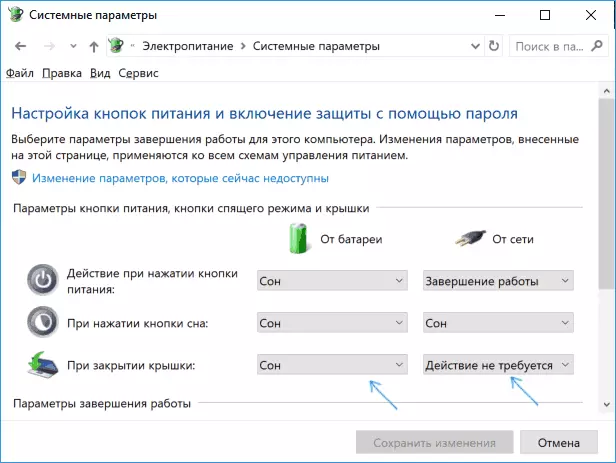
- Thov cov chaw ua.
Qhov tseeb, qhov no yog txaus: tam sim no uas koj kaw lub laptop npog, nws yuav tsis tua. Tsis txhob hnov qab xyuas cov kev hloov pauv mus rau hom pw tsaug zog, txij li koj muaj kev sib deev hom tom qab tas sij hawm, nws tseem yuav ua haujlwm ntxiv. Nyeem ntxiv rau ntawm cov ncauj lus: Pw Tsaug Zog Windows 10.
Kuj tseem xav txog qhov nuarance tom ntej: nyob rau theem ua ntej rub tawm Windows 10, koj lub cuab yeej yuav coj txawv txawv dua li nws tau teeb tsa hauv lub system. Piv txwv li, koj qhib lub laptop, nias lub logo tshwm sim, nws tau kaw tam sim ntawd, lub Windows 10 chaw tsis hloov (ntawm cov qauv tsawg, cov Cov cwj pwm tsim nyog rau hauv qhov no yog tam sim no hauv BIOS).
Lwm txoj kev pab kom lub laptop ua haujlwm nrog kaw lub hau
Muaj lwm txoj hauv kev los teeb tsa lub laptop tom qab, uas yog qhov tseem ceeb ib qho kev xaiv rau kev xaiv yav dhau los:
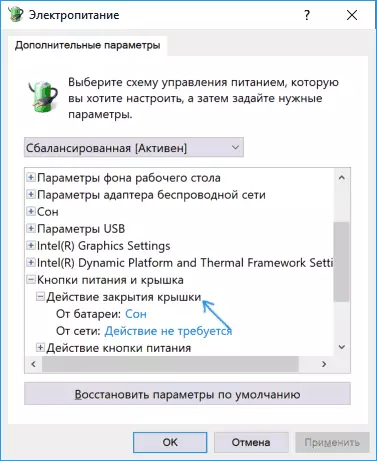
- Mus rau hauv lub zog chaw (Win + R - Powercfg.cpl).
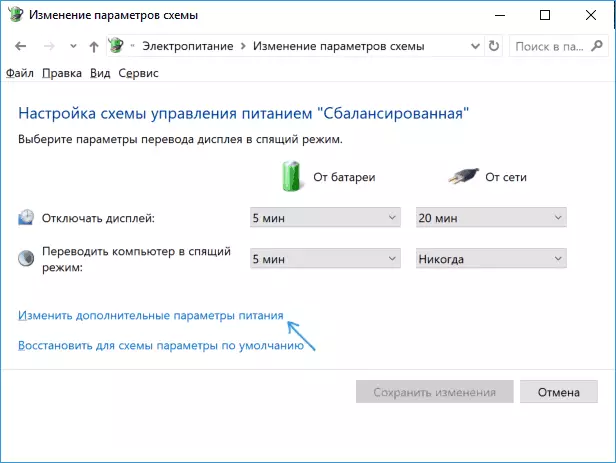
- Hauv cov "xaiv cov phiaj xwm", ntawm ib sab ntawm lub npe ntawm lub zog hluav taws xob nrog, nyem "teeb lub zog txheej txheem".
- Nyob rau hauv lub qhov rais tom ntej, Nyem "Hloov cov fais fab siab".
- Hauv seem "lub zog khawm thiab Cap" "Seem", tsim kev coj tus cwj pwm tsim nyog thaum koj kaw lub laptop npog thiab siv cov chaw.
Tam sim no lub laptop npog tuaj yeem raug kaw, thiab nws yuav ua haujlwm txuas ntxiv yam tsis tau hloov mus pw lossis kaw hauv lub xeev kaw.
Yog tias hauv phau ntawv no koj tsis pom lo lus teb rau koj cov lus nug, yog tias ua tau, nyob rau hauv cov lus qhia, yog qhia tau tus qauv ntawm lub laptop - Kuv yuav sim qhia kev daws teeb meem.