
In this instruction, it is detailed about using Easy2Boot (not to be confused with the EasyBoot paid program from the creators of Ultraiso) in a bundle with RMPRepusb (and without this utility). Someone may seem difficult to someone, but in fact, he is even simpler than some, just follow the instructions and you will be pleased with this ability to create multi-load USB drives. See also: The loading flash drive is the best programs for creating, Multi-loading drive from ISO with OS and utilities in Sardu
- Required files to create a flash drive Easy2Boot and where to download them
- Easy2Boot Preparation and Creation Process
- Download Easy2Boot in UEFI mode
- Additional Information
- Video instruction
- Another method of preparing multizrode flash drive
What you need to make a multi-load USB flash drive Easy2Boot
To prepare the boot flash drive using Easy2Boot, you will first need the components of the components of this tool for preparing the drive, as well as if you plan to install Windows 10, 8.1 or Windows 7 (or other systems) in UEFI mode - the MPI Tool Pack utility set.Easy2Boot Official download page - http://www.easy2boot.com/download/ On the specified page in the "About the downloads" section, go to the first link (I do not specify direct, since the placement varied several times), then load:
- Easy2.Boot Windows Installer - Components for preparing a flash drive, after downloading install on the computer (installation by fact is a unpacking into the same folder where the installer is located).
- Easy2.Boot For Making.IMGPTN. Files. - It is an archive with MPI Tool Pack with utilities for loading from flash drive and installation of systems in UEFI mode. After downloading, simply unpack at a convenient location if the use of drives in UEFI systems is assumed.
This preparation is completed and you can proceed to the use of the means.
Creating a multi-load flash drive or external hard in Easy2Boot
In the instructions further describe the main steps on recording the boot drive using Easy2Boot, in fact, a set of nuances are present in the use of the utility, which are scattered on the official website and sometimes you have to read well what. But for most applications, there are enough steps described below.
- Run the Easy2Boot utility installed (preferably on behalf of the administrator), or rather, make_e2b.exe. In the utility, select your flash drive (default, data from it is deleted), in the left pane you can select the language of the future load menu, the Russian is present.

- Press either the (red) Make E2B_Drive button - to quickly automatically prepare flash drives with formatting in NTFS (loading in UEFI systems will be possible), or the Make_E2B_USB_DRIVE.CMD button, in this case all formatting parameters will be set manually in the Console window in English.
- In the case of automatic preparation of the USB drive under Easy2Boot (however, in manual mode, you will see the same) in the process you will see a warning that the data will be removed from the program itself (here you need to agree), and then - the offer to format the Windows drive - It should be refused here: the point is that the new service section appeared on the flash drive, a manner formatted by the desired program and do not need to do something with it. The message about the unrecognized file system should also be ignored.
- Upon completion, the console window will acquire a green background color, and you will see that the drive is prepared. The console can be closed, and in the Make_E2B program, click the refresh button, and then "Test with QEMU" to check that the menu from the flash drive is loaded (on errors in QEMU, for example, the absence of a hard disk should not pay attention to).
- The flash drive is prepared, and it is already possible to load it, the storage preparation utility can be closed. It remains to add ISO files to it with Windows 10, 8.1 and Windows 7, Linux, antivirus, utilities and other tools. You can place several different images with one system. To do this, open the Flashplay partition with the E2B mark and go to the _iso folder, it is in it that invested inside the folders should place ISO, VHD, WIM images and others.

- Windows installation files - \ _iso \ windows \ version. Do not hurry to copy your ISO if you need download in UEFI mode to install on a GPT disk - on this then in the instructions.
- \ _Iso \ Mainmenu - files that will be located immediately in the main menu.
- Similarly, you can place the desired images in the Anitivirus attached folders (anti-virus discs), Backup (backup tools), Linux, etc.
- After copying all the images, in the root folder of your flash drive, run the Make_This_Drive_contiguous.cmd file to defragment the images on the flash drive (it may be necessary to work Linux and utilities).
- In essence, it's all, and you can already start the USB flash drive in Legacy mode (of course, with the secure boot disabled) and it's all that was placed, choosing in your menu.
Caution: Described Next Conversion Conversion to the IMGPTN format can be useful not only for UEFI download, but also in case your image does not work in Legacy mode.
Preparation of images for UEFI download using Easy2Boot and boot process
By default, from the flash drive, we can only boot in Legacy mode. To download in UEFI, the following mechanism is offered:
- From the folder with the MPI Tool Pack, set to the IMDISK computer.
- From the same folder, run the MakePartImage_autorun_ntfs or Fat32 file (depending on the file system of the flash drive).

- The console window will open, where the path to the image file is to convert to the .imgPTN format (you can copy the path to the image file by clicking on it with the right mouse button with the shift in the explorer, and then insert into the console and remove quotes).
- Next will begin the stages of the conversion of the image, in English. It is usually enough to use the default values simply by pressing ENTER.
- Upon completion, in the same folder where the ISO image is the image, you will receive an image in the format of IMGPTN - it should be placed on the Easy2Boot flash drive to boot to UEFI.
Loading itself in EFI mode (Disable Secure Boot to BIOS may be required, and may not be required, depending on the image itself and the presence of a refind bootloader, which is not written by default) as follows:
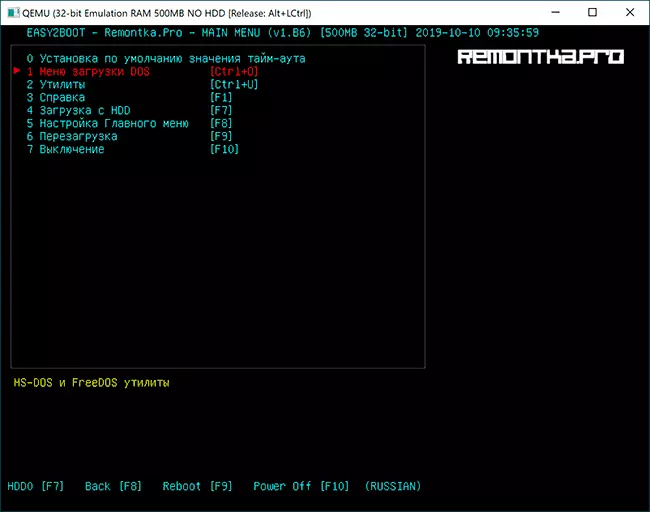
- Loading from the Easy2Boot flash drive in Legacy mode and select the desired IMGPTN image in the menu. Confirm the change in the E2B of the section by entering Y. After that, the computer may look fossil or repeatedly rebooted - this is normal.
- After changing the section, the Easy2Boot CSM Menu menu opens (menu running in Legacy mode), the first point in which allows you to boot from the selected image in Legacy mode to install on the MBR disk.
- If we do not need it, reboot the computer and select the download from the flash drive, but already in UEFI mode (now the flash drive supports two load modes at once). If the REFIND bootloader is missing, immediately starts the load from the image, as if there is nothing on the flash drive except this image. If installed Refind, select the item on the right in the menu (Boot EFI FROM EASY2BOOT).
- If the download from the first time does not pass (encountered this to refind with Windows images), turn off the computer or laptop long retaining the power button, and then repeat the download again.
How does it work at all? After "Changes in the E2B section" in the first step, your IMGPTN image is mounted on the USB flash drive, as a result, it seems to be nothing else - i.e. We load as if "directly" into the image. Accordingly, the flash drive ceases to be multi-load (although all data on it remains).

To return the drive to the original state, open the E2B folder on the flash drive and run the restoree2b.cmd file on behalf of the administrator.
Additional Information
Some additional information that I will try to update as the new information appears, and the nuances, as I mentioned, a lot in the program:- If in a folder with the image file (format is not important) Place the file with the same name, but the .txt extension and contents in one line, the Name of the menu item in the menu will be displayed your name.
- The _iso folder on the flash drive is a file E2B_Editor to edit the background, colors and other download menu options.
- Using \ _iso \ sub_umenu_maker.cmd You can add your own sections in the Easy2Boot main menu.
- The MPI Tool Pack has a Split Winiso utility to separate Windows image files into several files for the premises of large images on the FAT32 USB flash drive.
- If you use an external hard disk or a flash drive, which is defined in the system as a local disk, and not a removable drive, then when installing Windows 10, 8.1 and Windows 7, you may not report about the absence of drivers. The IMGPTN method is solved, but it can potentially cause data loss on the drive.
Video instruction Easy2Boot
All that below was written to use the previous version of Easy2Boot and, as far as I can judge, this method still has to work, therefore I do not remove it from the instruction. Also, if you have your finds on the use of the utility - I will be glad to comment.
Early method for creating Easy2Boot drive (continues to work)
The following files were checked by Virustotal, everything is clean, with the exception of the threat pair (which are not) in Easy2Boot, which are related to the implementation of work with installation ISO images.We will need Rmprepusb, take here https://www.rmprepusb.com/documents/rmprepusb-beta-versions (the site is sometimes poorly available), download links closer towards the end of the page, I took the RMPRepusb_Portable file, that is, not installed. Everything works.
You will also need an archive with Easy2Boot files. You can download here: http://www.easy2boot.com/download/
Easy2Boot multisart flash drive preparation process
Unpack (if portable) or install RMPRepusb and run it. Easy2Boot do not need to unpack. Flash drive, I hope already connected.
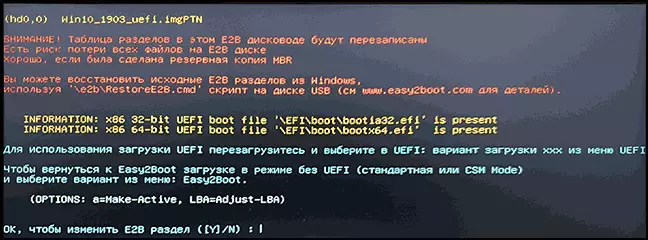
- In RMPRepusB, check the item "Not to ask questions" (No User Prompts)
- Partition Size - Max, Tom Tag - any
- Boot Sector (Bootloader Options) - Win PE V2
- File system and options (FILESSTEM AND OVERRIDES) - FAT32 + BOOT AS HDD or NTFS + BOOT AS HDD. FAT32 is supported by a large amount of OS, but does not work with more than 4 GB files.
- Mark "Copy system files from the following folder" item (Copy OS Files From Here), specify the path to the non-unpacked archive with Easy2Boot, answer "no" to the request that will appear.
- Click the "Prepare Disk" button (all data from the flash drives will be deleted) and wait.
- Click the Install Grub4dos button (Install Grub4dos), answer the "no" request for PBR or MBR.
Do not leave RMPRepusb, the program will still need (if you came out, nothing terrible). Open the contents of the flash drive in the explorer (or other file manager) and go to the _iso folder, there you will see the following folder structure:

Note: In the DOCs folder, you will find the documentation for English to edit the menu, design and other features.
The following action on creating a multi-load flash drive is to transfer all the necessary ISO images to the desired folders (you can use multiple images for one OS), for example:
- Windows 10 - in _iso \ windows \ win10
- Windows 8 and 8.1 - in _iso \ windows \ win8
- Antivirus ISO - in _iso \ antivirus
And so on, by context and the name of the folders. Images can also be put in the root of the _iso folder, in this case they will be displayed in the main menu when loading from the flash drive.
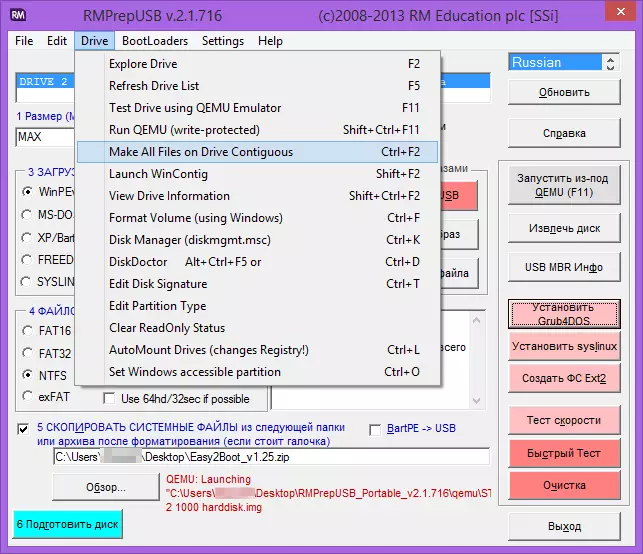
After all the desired images are transferred to the USB flash drive, in RMPRepusb, press Ctrl + F2 or in the menu, select Drive - Make All Files on Drive Contiguous. Upon completion of the operation, the flash drive is ready, and you can either boot from it or press F11 to test it in QEMU.
Correction of media driver error when loading with USB HDD or flash drive Easy2Boot
This supplement to the instructions is prepared by the reader under the nickname Tiger333 (its other tips can be found in the comments below), for which he has been thank you very much.When installing Windows images using Easy2Boot, the installer often gives an error about the absence of a carrier driver. Below - on how to fix it.
You will need:
- Flash drive of any size (you need a flash drive).
- Rmprepusb_portable.
- Your USB-HDD or flash drive with installed (working) Easy2Boot.
To create an Easy2Boot virtual drive driver, you prepare the USB flash drive almost as when installing Easy2Boot.
- In the RMPRepusB program, check the item "Not to ask questions" (NO User Prompts)
- Partition Size - Max, Tom Tag - Helper
- Boot Sector (Bootloader Options) - Win PE V2
- File System and Options (FILESSTEM AND OVERRIDES) - FAT32 + BOOT AS HDD
- Click the "Prepare Disk" button (all data from the flash drives will be deleted) and wait.
- Click the Install Grub4dos button (Install Grub4dos), answer the "no" request for PBR or MBR.
- We go to your USB-HDD or flash drive with Easy2Boot, go through \ _iso \ docs \ usb flash drive helper files. Copy all of this folder on the prepared USB flash drive.
Your virtual drive is ready. Now you need to "introduce" virtual drive and Easy2Boot.
Remove the flash drive with the drive from the computer (insert a USB-HDD or flash drive with Easy2Boot, if taken out). Run RMPRepusB (if closed) and click "Run from under QEMU (F11)". During Easy2Boot download, insert your flash drive with a computer drive and wait for the menu boot.
Close the QEMU window, go to your USB-HDD or a USB flash drive with Easy2Boot and look at the autouunattend.xml and unattend.xml files. They must be 100kb, if this is not so repeat the acquaintance procedure (I turned out only with the third time). Now they are ready to work together and problems with the missing driver will disappear.
How to use a flash drive with the drive? Immediately make a reservation, this flash drive will only work with a USB-HDD or Easy2Boot flash drive. Use the flash drive with the drive is simple enough:
- During Easy2Boot download, insert your flash drive with a computer drive and wait for the menu boot.
- Select a Windows image, and to select Easy2Boot "How to Set" - select .iso, follow the instructions of the OS installation instructions.
Problems that may arise:
- Windows again issues an error about the absence of a carrier driver. Cause: You may have inserted a USB-HDD or USB 3.0 USB flash drive. How to fix: Move them into USB 2.0
- The screen starts 1 2 3 and constantly repeated, Easy2Boot is not loaded. Cause: Perhaps you inserted a flash drive with a drive too early or immediately with a USB-HDD or Easy2Boot flash drive. How to fix: Enable a flash drive with a drive as soon as the Easy2Boot load starts (the first download words will appear).
Notes on the use and change of multi-load flash drive
- If some ISOs are loaded incorrectly, change the extension to .isoask, in this case, when you start this ISO, you can select various options for starting it and find a suitable one from the boot menu.
- At any time you can add new or remove old images from the flash drive. After that, do not forget to use Ctrl + F2 (Make All Files On Drive Contiguous) in Rmprepusb.
- When installing Windows 7, Windows 8 or 8.1, you will be asked for what key to use: You can enter it yourself, use the test key from Microsoft, or make the installation without entering the key (then the activation will still need). This note is writing to the fact that you should not be surprised at the appearance of the menu, which was not before when installing Windows, it is not enough for what.
With some special configurations of the equipment, it is best to go to the official website of the developer and read about how to solve possible problems - the material is enough. You can also ask questions in the comments, I will try to answer.