
However, in contrast, for example, from RUFUS, novice users are not always easy to figure out how to use WinsetupFromusB, and, in the end, they use another, possibly simpler, but often less functional option. It is for them that this basic instruction manual is intended for the use of the program in relation to the most common tasks. See also: Programs for creating a loading flash drive.
Where to download WinsetUpfromusb.
In order to download WinsetupFromusB, it is enough to go to the official website of the program http://www.winsetupfromusb.com/downloads/, and download it there. The site is always available as the latest version of WinsetupFromusB and previous builds (sometimes useful).The program does not require installation on a computer: it is enough to unpack the archive with it and run the desired version - 32-bit or X64.
How to make a bootable USB flash drive using WinsetupFromusB
Despite the fact that the creation of the loading flash drive is not all that can be done using this utility (which includes another 3 additional tools for working with USB drives), this task is still the main one. Therefore, I will demonstrate the fastest and easiest way to perform it for a novice user (in the above using the flash drive will be formatted before writing to it).
- Connect the USB flash drive and run the program in the discharge you need.
- In the main program window in the top field, select the USB drive to which the record will be made. Note that all data on it will be deleted. Also tick the AutoFormat IT WITH FBINST item - this automatically format the USB flash drive and prepare it to turn into the bootable when you begin. To create a flash drive for UEFI download and install on a GPT disk, use the FAT32 file system for Legacy - NTFS. In fact, the formatting and preparation of the drive can be performed manually using the Bootice, RMPRepusB utilities (and you can make a flash drive and without formatting), but for the beginning the easiest and fastest method. Important note: Mark the Automatic Formatting item should only be recorded if you first recording the images on the USB flash drive using this program. If you already have a boot flash drive created in WinsetupFromusB and you need to add, for example, another Windows installation, then simply perform actions below, without formatting.
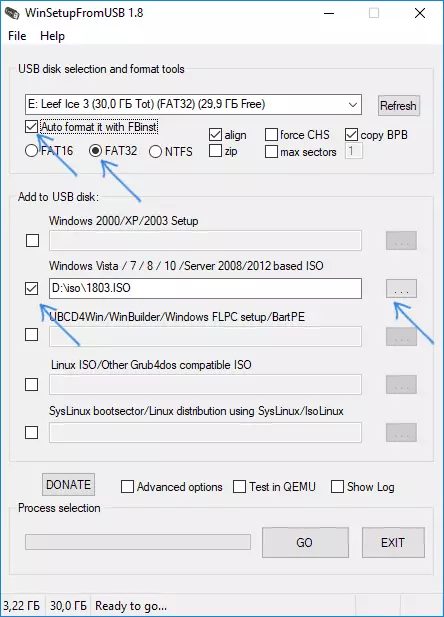
- The next step is to indicate what we want to add to the USB flash drive. This can be several distributions at once, as a result of which we get a multi-load flash drive. So, I celebrate the checkbox the desired item or somewhat and specify the path to the files you need to work (for this press the button with the ellipsis to the right of the field). Items must be understood, but if not, then then their description will be given separately.
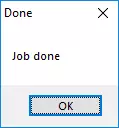
- After all the necessary distributions were added, simply press the GO button, we affirmatively respond to two warnings and begin to wait. I note if you make a boot USB drive, which is present Windows 7, 8.1 or Windows 10, when copying a Windows file.wim it may seem that WinsetupFromusB hung. It is not so, take care of patience and expect. When the process is completed, you will receive a message as in the screenshot below.
Next, about which items and which images you can add to various items in the main window of WinsetupFromusB.
Images that can be added to the WinsetupFromusb boot flash drive
- Windows 2000 / XP / 2003 SETUP - We use in order to place the distribution of one of the specified operating systems on the flash drive. As a way, you must specify the folder in which the I386 / AMD64 folders (or only i386) are located. That is, you need to either mount the ISO image from the OS in the system and specify the path to the virtual drive of the disks, or insert a disk with Windows and, accordingly, specify the path to it. Another option is to open an ISO image using the archiver and extract all the contents into a separate folder: In this case, you will need to specify the path to this folder in the WinsetupFromusB. Those. Usually, when creating a Windows XP boot flash drive, we simply need to specify a disk letter with a distribution.
- Windows Vista / 7/8/10 / Server 2008/2012 - To install the specified operating systems, you need to specify the path to the ISO image file with it. In general, in previous versions of the program it looked different, but now they did easier.
- UBCD4WIN / WinBuilder / Windows FLPC / Bart PE - Also, as in the first case, you will need the path to the folder, which contains i386, is intended for various WinPE-based boot discs. The novice user will hardly need.
- Linuxiso / Other Grub4dos Compatible ISO - It will be necessary if you want to add a Ubuntu Linux distribution (or other Linux) or any disk with utilities to restore a computer, viruses check and similar, for example: Kaspersky Rescue Disk, Hiren's Boot CD, RBCD and others. Most of them use Grub4dos.
- Syslinux Bootsector - Designed to add Linux distributions, which use the SYSLinux bootloader. Most likely, it is not useful. To use, you must specify the path to the folder in which the Syslinux folder is located.
Additional bootable flash drive
Next, briefly about some additional features when using WinsetUpFromUSB to create a boot or multi-load flash drive or an external hard disk that may be useful:
- For a multi-load flash drive (for example, if there are several different images of Windows 10, 8.1 or Windows 7, you can edit the boot menu in Bootice - Utilities - Start Menu Editor.

- If you need to create a bootable external hard disk or flash drive without formatting (i.e. so that all the data on it remains), you can use the path: Bootice - Process MBR and install the main boot record (Install MBR, it is usually enough to use all parameters. default). After that add images to WinsetUpFromusB without formatting the drive.

- Advanced options (ADVANCED OPTIONS) Allows you to additionally configure individual images placed on a USB drive, for example: Add drivers to install Windows 7, 8.1 and Windows 10, change the names of the download menu items from the drive, use not only USB device, but also other drives On a computer in WinsetupFromusB.
Video Instructions for using WinsetupFromusB
Also recorded a small video in which it is shown in detail how to make a boot or multi-load flash drive in the described program. Perhaps someone will be easier to understand what.Conclusion
On this instruction on using WinsetupFromusB completed. All you have left is to download the download from the flash drive in the computer's BIOS, to use the newly created drive and boot from it. As noted, it is not all the possibilities of the program, but in the overwhelming majority of cases of the items described will be quite enough.